

When developing web applications, one of the important things is to provide smooth accessibility of your product to the clients. But that is not an easy task to accomplish as several factors come into play. Software testing requires coverage of many different devices, environments, and conditions. We in Loadero provide features to use different browsers, run tests from different locations, set different fake media for webcam and mic simulation, etc. One of the very important parameters to set for participants in your tests is network conditioning, which corresponds to simulating different network limitations where users’ network access could be slow, unstable, or even when disappears completely. Testing your web application performance with various network types and packet loss cases is a must to make sure everything works great for a wide audience. So today we will be taking a look at how we can simulate these scenarios for your test automation using Loadero.
Here are some examples of what can be accomplished by such testing:
- Test if the sudden internet connection loss is being handled accordingly
- Check load times of your application with reduced network speed
- Validate video calling application stability with network packet loss
Default network configuration
Tests in Loadero by default do not set any explicit network limitations. This means the user can expect the available network to be stable and in almost all cases fast enough for testing your web application without worrying about network speed being a bottleneck and providing incorrect testing results. Specific network bandwidth is hard to estimate as it depends on the number of participants used within a test. But you could expect it to be close to carrier-grade for each participant.
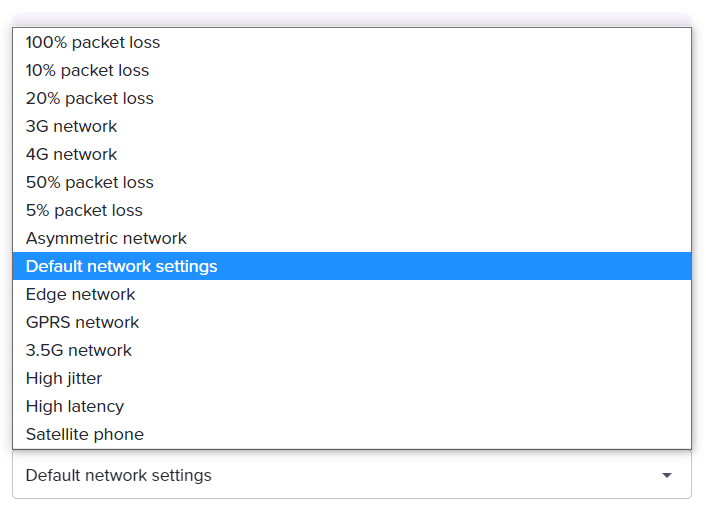
Available network configuration presets
We have defined some general network configuration presets and made them available for participant configuration and as constants which we can pass to our “Update network” custom command to change the conditions while a test is running. Here are the available presets, their constant names, and the limitations set upon them. You can read more about available constants within Loadero and how to access them for Javascript, Java, and Python.
| Title | Constant | Latency* | Jitter* | Rate* | Packet loss* |
| Default | default | – | – | – | – |
| 4G | mobile_4g | 45ms | 45ms | 15ms | 5ms | 50mbit | 100mbit | 0.2% | 0.2% |
| 3.5G/HSPDA | mobile_hsdpa | 150ms | 150ms | 10ms | 10ms | 10mbit | 20mbit | 0.5% | 0.5% |
| 3G | mobile_3g | 250ms | 250ms | 50ms | 50ms | 1200kbit | 1200kbit | 0.5% | 0.5% |
| GPRS | mobile_gprs | 650ms | 650ms | 100ms | 100ms | 20kbit | 80kbit | 1% | 1% |
| Edge | mobile_edge | 650ms | 650ms | 100ms | 100ms | 260kbit | 200kbit | 1% | 1% |
| High jitter | jitter | 200ms | 200ms | 100ms | 100ms | – | – |
| High latency | latency | 500ms | 500ms | 50ms | 50ms | – | – |
| Asymmetric | asymmetric | 50ms | 50ms | 10ms | 10ms | 1000kbit | 500kbit | – |
| Satellite phone | satellite | 600ms | 600ms | – | 256kbit | 1000kbit | – |
| 5% packet loss | packetloss5 | – | – | – | 5% | 5% |
| 10% packet loss | packetloss10 | – | – | – | 10% | 10% |
| 20% packet loss | packetloss20 | – | – | – | 20% | 20% |
| 50% packet loss | packetloss50 | – | – | – | 50% | 50 |
| 100% packet loss | packetloss100 | – | – | – | 100% | 100% |
* Network conditions upload and download settings in that specific order.
The presets can be used to configure different network conditions for different test participants. Later you compare the performance or just validate that the tested application properly handles imperfect network connections users might have.
It is a very common case for testing video communication apps: you can configure two participants, one with the Default network connection and another one with limited, for example, 4G. In the results reports, we later can compare audio and video metrics to see how different the quality was for users with such different network connection parameters. Similarly to that, a command to measure the execution time of a function can be added to a test script to check how different network limitations impact that. You can read about the command for Javascript, Java, and Python in our wiki.
Configuring different network conditions for test participants
We’ll use JavaScript + Nightwatch language for this example. For more info on using Nightwatch in Loadero, make sure to read this blog post with our beginner’s guide to test automation with Javascript. Now let’s create a new test and name it “Update network test”. Set this test to “performance test” mode, set “Increment strategy” to “Linear,” with start interval set to 10 seconds, and participant timeout to 3 minutes. Currently, we will leave the script to the default suggested one and get back to it later on.
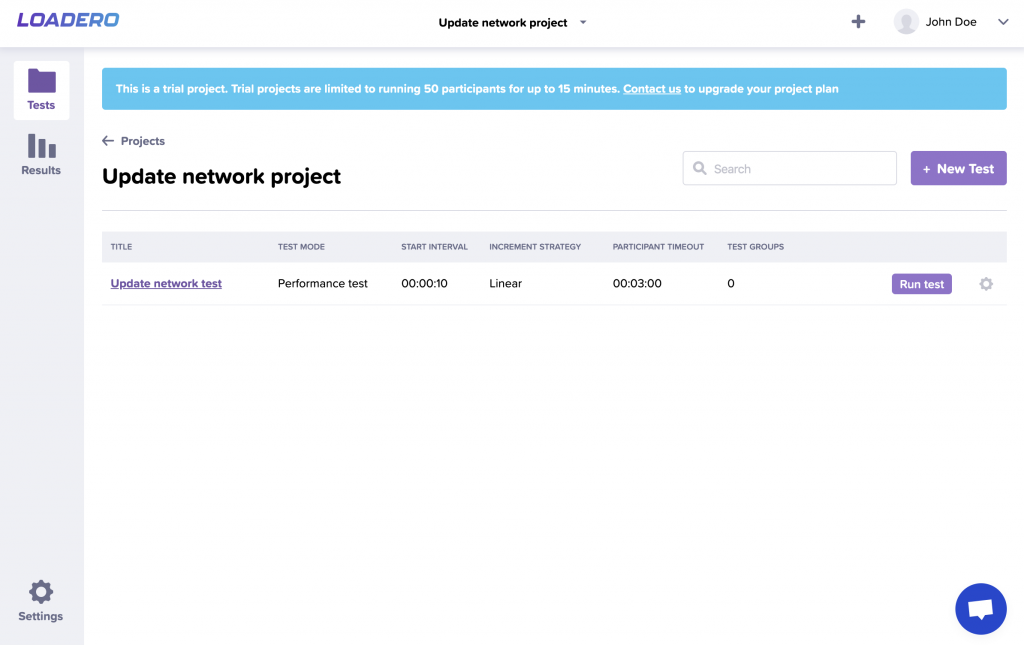
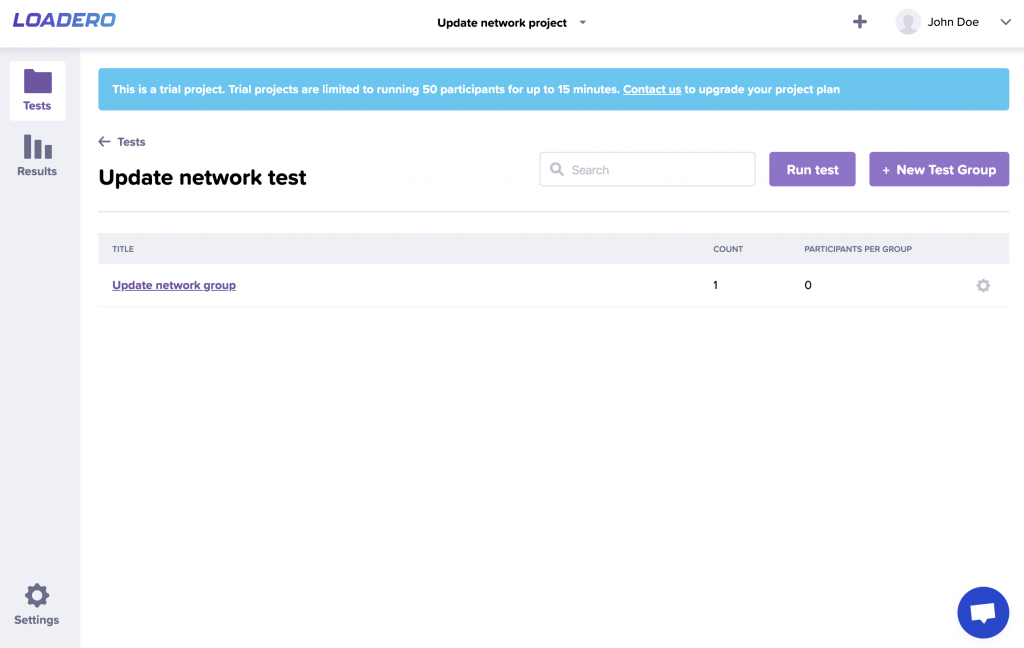
After creating a test, we need to create a group where participants will be held. Let’s call it “Update network group” and set the count to 1.
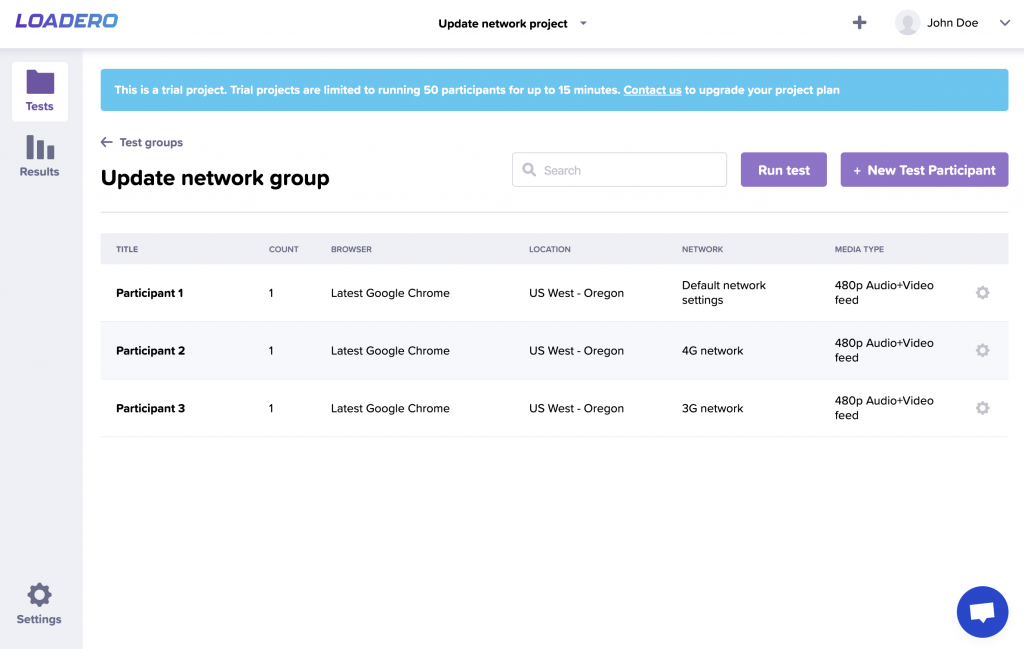
Now that we have created a test and also a group inside the test, we can create participants who will be used for this test. To show different possible participant network conditions for this example, we will create 3 participants with different names and network conditions:
Now that we have created participants for the test, let’s revisit the test script, which we will be using for this example. Go to the test screen, press the gear icon on the right side of your created test row, a dropdown menu will appear with several options. Choose “Edit” from these options. This will take you to the test edit screen, and there you can edit previously saved the script and press “Save” after making your changes. The script we will be using will open network speed test Speedtest.net, run the speed test, and, as soon as it has finished, take a screenshot of the page. We will be able to see this screenshot later in the test results. Doing this will provide visual feedback on the Loadero network conditioner in action.
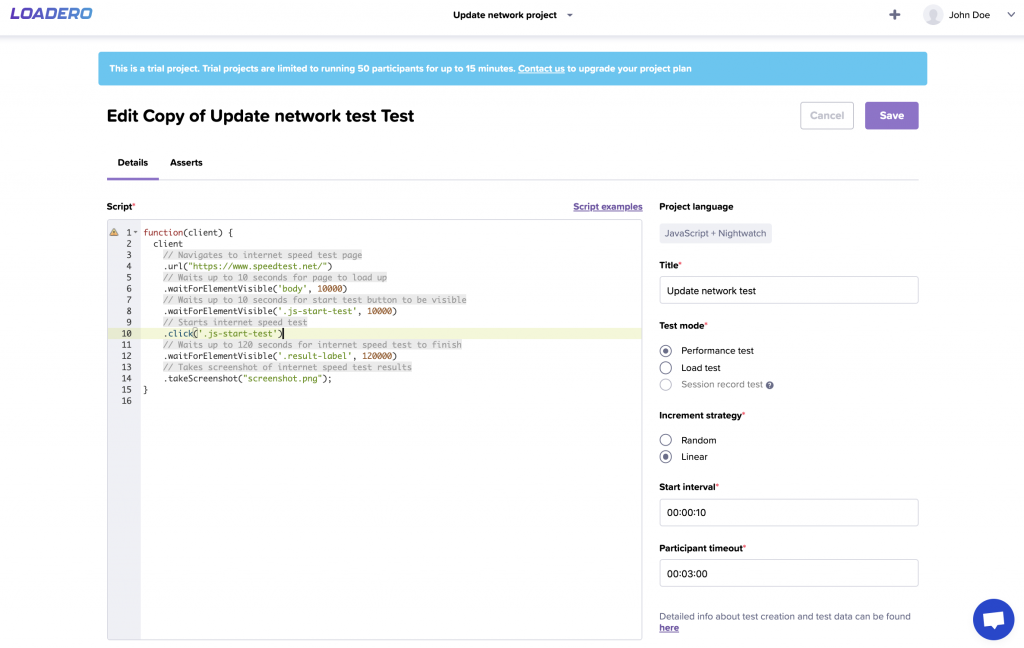
Script used in the example:
function(client) {
  client
    // Navigates to internet speed test page
    .url("https://www.speedtest.net/")
    // Waits up to 10 seconds for page to load up
    .waitForElementVisible('body', 10*1000)
    // Waits up to 10 seconds for start test button to be visible
    .waitForElementVisible('.js-start-test', 10*1000)
    // Starts internet speed test
    .click('.js-start-test')
    // Waits up to 120 seconds for internet speed test to finish
    .waitForElementVisible('.result-label', 120*1000)
    // Takes screenshot of internet speed test results
    .takeScreenshot("screenshot.png");
}
Since all our preparations are complete, press the “Run test” button and wait for the test to finish its execution. When it has finished, open the results screen and press “View results” for the corresponding test run to see the report.
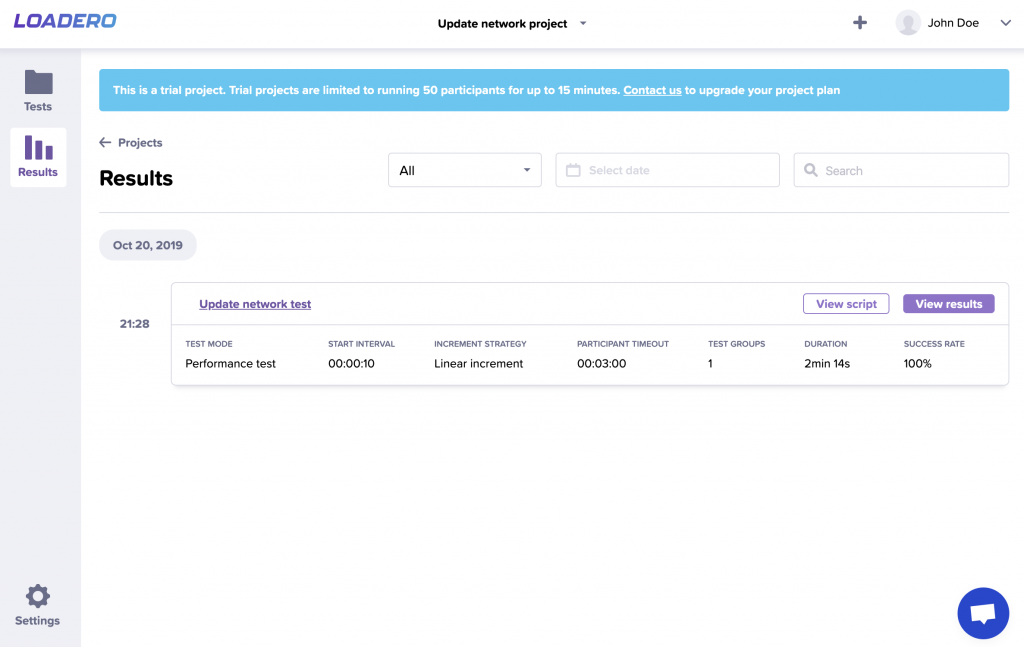
In the report screen, we can see all kinds of different statistics for the test run, but let’s not focus on them in this case. Switch to the “Participants” tab and select any one of our participants, to see more detailed info about that specific participant. More information about Loadero reports and how to use them can be found in this blog post.
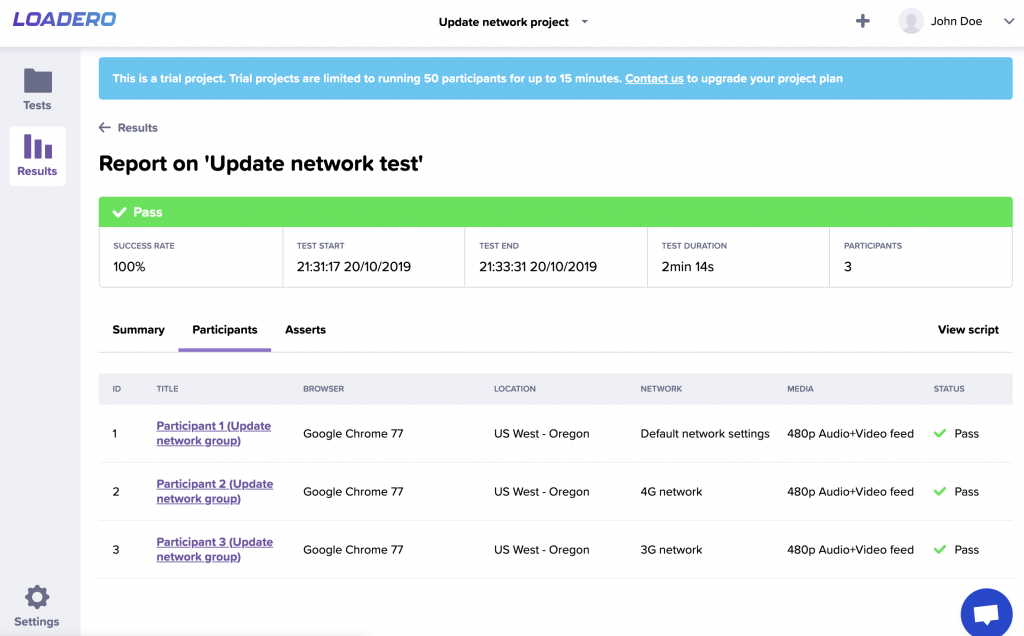
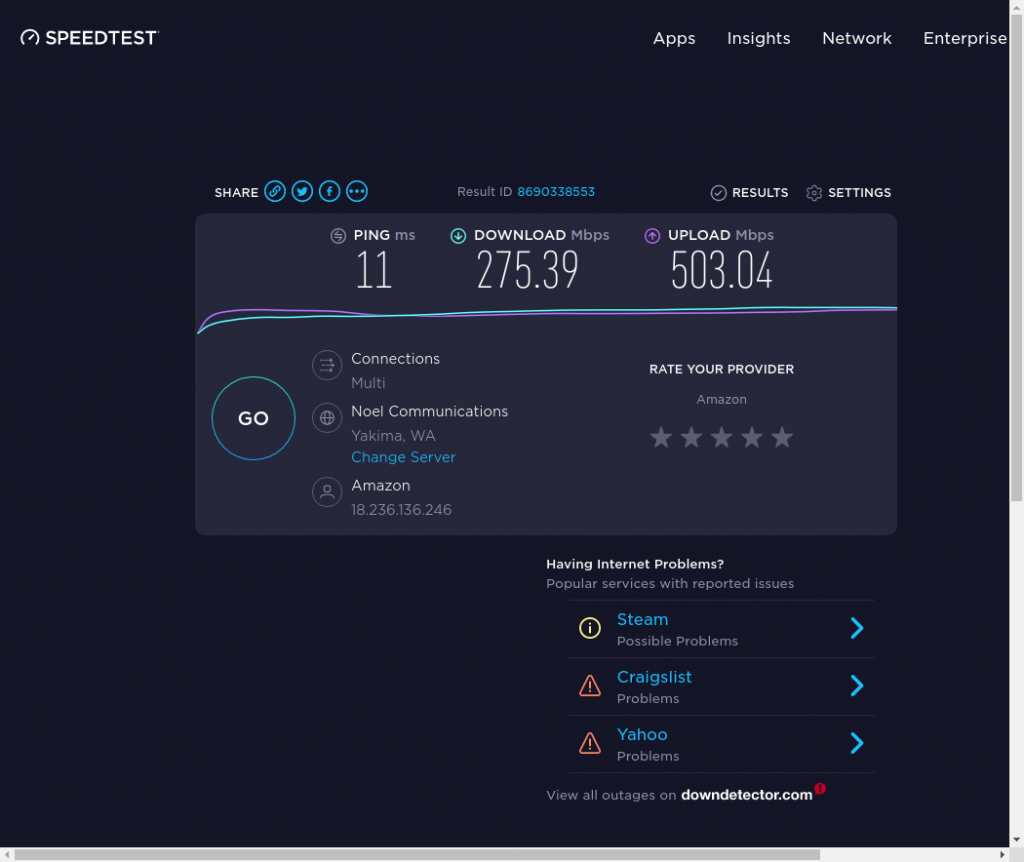
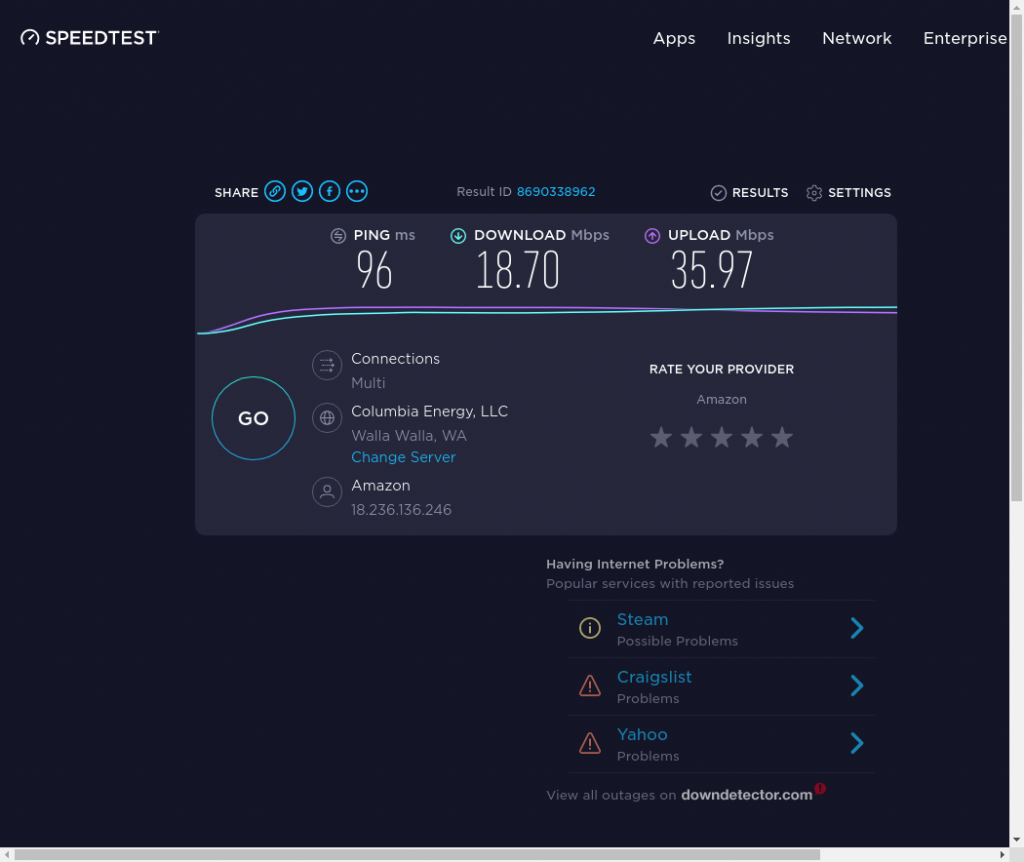
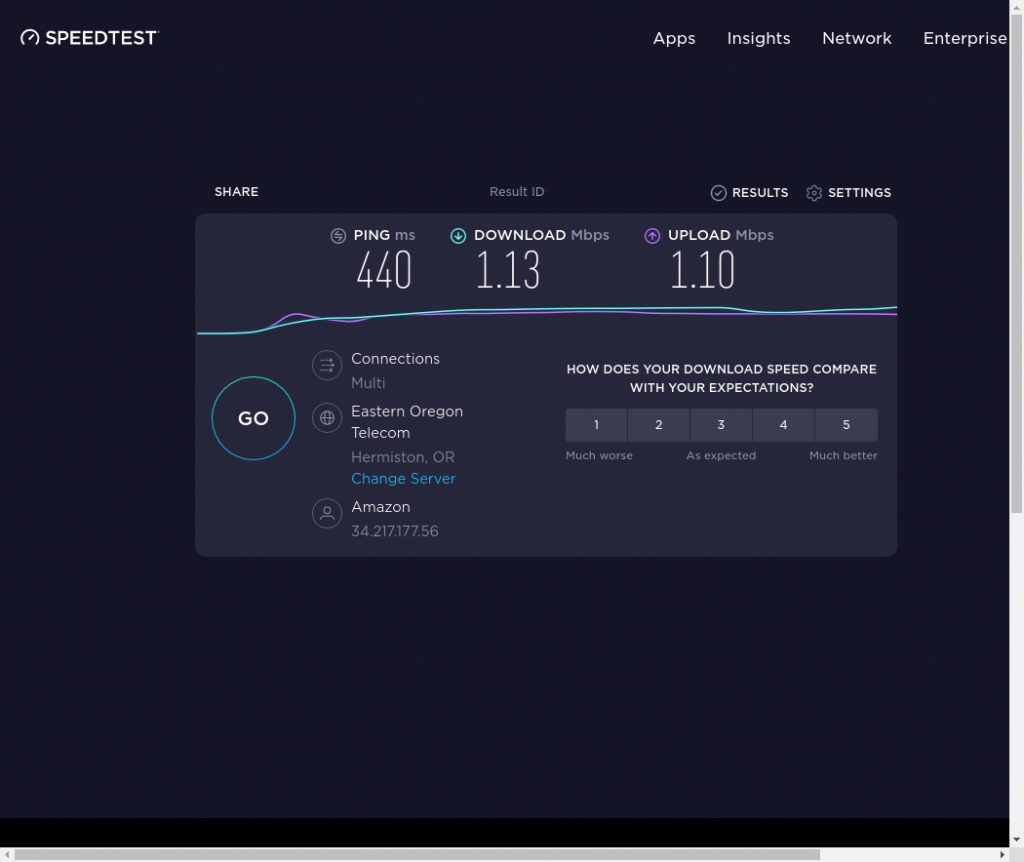
This time we are interested in the network information that is gathered in the screenshot. You can download it from the “Artifacts” tab. So we will switch to that tab and download the screenshot available there.
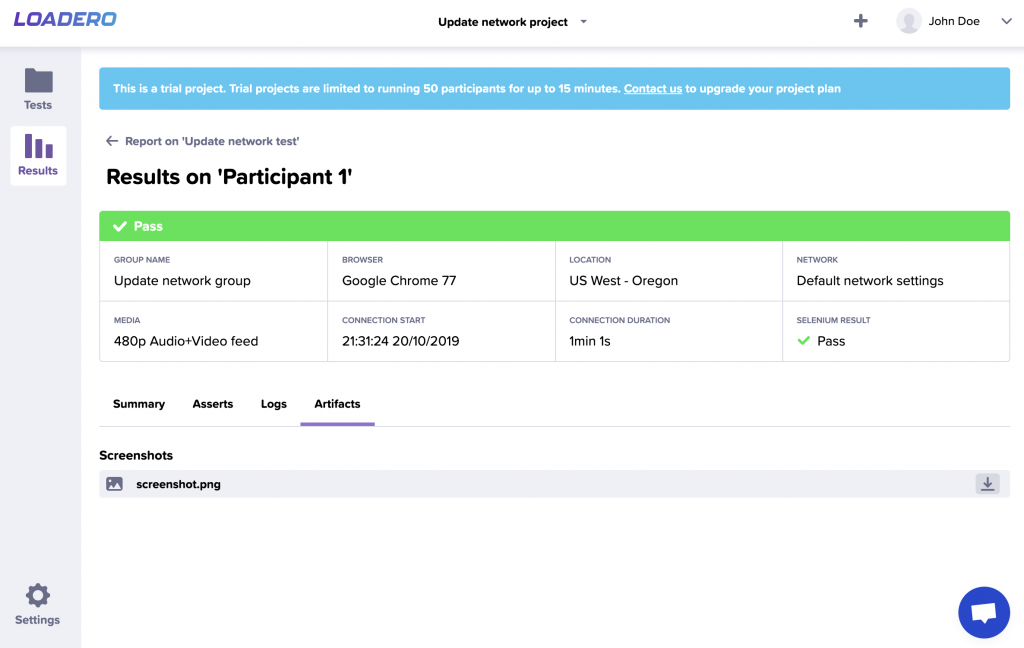
Now opening that image, we can compare it to other participant screenshots and see how network conditions have altered the results. As you can see in the pictures below, all screenshots have produced different results. The network conditioner has successfully adjusted the participants network conditions.
Command to set network conditions during a test run
The approach described above allows running a test in different network conditions, but they stay the same during the whole test run. For scenarios where network conditions change while a user is using an application, Loadero has created a custom command “Update network” in all available languages just for the specific purpose of adjusting individual test participant network conditions during a test run. You can read more about this command here for Javascript, Java, and Python.
Here is a simple script example using Nightwatch JS to adjust network conditions during test runtime using one of the available preset network configurations which we just covered.
client => {
   client
       .updateNetwork(loaderoConstants.network.mobile_3g)
       .url("https://www.google.com")
       .waitForElementVisible("body", 10*1000);
}
The use of the command in the test scripts allows simulating scenarios of changing network conditions while the use of the application continues. For example, a group video call is happening and one of its attendees is exiting a building while still in the call. This can cause switching from a WiFi network to 4G. This switch can reduce the quality of the video the user is sending and receiving. So we can test how an application handles that. To simulate such flow we’d set the Default network connection for the test participant first, and use the Update Network command in the test script to change the network conditions later during the test run.
Tip: When calling the “Update network” custom command, previously set network limitations are removed, and then the new ones are applied. So combining different presets together like that is not possible, but there is still a way how to achieve this which we will cover in the next paragraph.
Setting custom network configuration
Loadero has a wide array of network conditions presets with different parameters, but sometimes specific network conditions must be set for a participant. For this there is one more constant – “custom”, we can pass it to the “Update network” command. Using this constant you must pass in an extra object to the command containing the network conditioner values you want to set for upload and download settings for jitter, packet loss, latency, and bandwidth. This way you can set up your network limitations for your testing scenario. Here is an example of how to do it in Nightwatch JS, refer to “Update network” custom command wiki pages for other examples for Java and Python.
client => {
   let customNetworkConfig = {
       latency_up: 100,
       latency_down: 50,
       jitter_up: 20,
       jitter_down: 10,
       rate_up: 50,
       rate_down: 80,
       loss_up: 5,
       loss_down: 75,
   };

   client
       .updateNetwork(loaderoConstants.network.custom, customNetworkConfig)
       .url("https://www.google.com")
       .waitForElementVisible("body", 10*1000);
}
One example of how the custom network conditions can be used is setting a 100% packet loss for a short period of time during a test run and then changing the conditions one more time to restore the connection. This approach allows simulation of the user losing his network connection for some time and testing how an application handles a user being disconnected and reconnected.
Tip: You can skip defining some of the configuration rules, if no value is set for a specific limitation rule then it will be reset to its default (unlimited) value.
In conclusion, there are a lot of ways how to adjust network configuration for Loadero test participants. As these limitations are set for each participant individually, you can apply different rules for different participants within the same test script using participant or group IDs. Also, you can update the settings during runtime, so they can simulate changing configurations in real-time as users are proceeding through their testing scenario. Use these methods to create a test, which allows you to understand how an application handles all the different network conditions your users experience or might have.