

Welcome to our blog post about unlocking the full potential of Loadero beyond its Web App interface. While the Loadero Web App provides a user-friendly platform for conducting end-to-end tests with a global reach, did you know that you can also create, manage, and execute tests using the Command Line Interface (CLI)? In this blog post, we will guide you through the essential steps to harness Loadero’s CLI, including the test generator, test manager, test runner, and statistics modules – all seamlessly integrated with the Loadero Python library.
Prerequisites
- Loadero Account and Project: Make sure you have an active Loadero account with a project set up.
- Code Editor: To work with the CLI effectively, you’ll need a code editor. We recommend using Visual Studio Code due to its user-friendliness and extensibility.
- Python: Loadero’s CLI relies on the power of Python. While it’s ideal to have the latest Python version, this guide will demonstrate using Python version 3.11.
Now that you have these essentials in order, let’s dive into the capabilities of Loadero’s CLI, which will enhance your testing processes and boost efficiency.
1. Command Line Interface (CLI) Test Generator
The CLI (Command Line Interface) test generator is a powerful tool that allows you to create tests directly from the command line, offering you greater flexibility and control over your testing processes. This means you can generate tests without relying on the Loadero Web App’s graphical interface. Before proceeding with the CLI test generator, it is highly recommended to peruse the guidelines on the creation and execution of tests via the GUI, which will familiarize you with the process of creating tests. To set up the CLI test generator, you need to configure the
Loadero Library
You can clone Loadero library inside your local project.
Python environment setup instructions:
# Create virtual environment
python -m venv venv

# Activate virtual environment
source venv/bin/activate

# Install dependencies
pip install -r requirements.txt

# When done
deactivate
CLI Test Generator
Important: Make sure that you initialize a local backup of the project first. Refer to the “Test Case Manager” section further below on how to do that.
To execute the script, run the following command:
python test_generator.py \
--access_token {ACCESS_TOKEN} \
--project_id {PROJECT_ID}  \
--log_level {LOG_LEVEL}
where
access_tokenis the destination project’s access token. You can find the access token (and create one, if needed) in the Loadero web app, by navigating to project settings and selecting the API access tab on the left.project_idis the destination project’s ID.log_levelis an argument for debugging purposes that can be info, INFO, debug, DEBUG. The default value is info/INFO.
Note: Please place your test’s code inside the default_test directory.
Once the script is executed, project particulars such as the name and language will be visible. You can then enter the test parameters, as demonstrated in the image below. If any of these parameters are omitted, a test featuring default values will be generated.
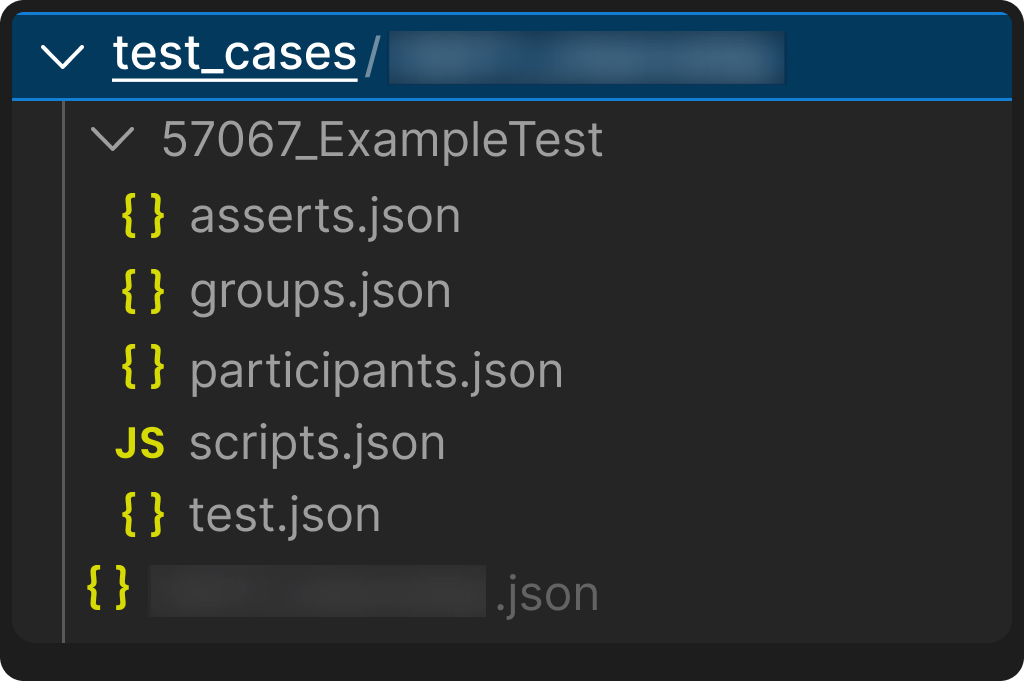
Once the test is created, the test will be present in the test_cases directory. However, it is important to note that the CLI test generator does not encompass the creation of assert preconditions, which can only be generated via the GUI.
Note: The test id is randomly generated and will be replaced.
In conclusion, the CLI test generator is a useful tool for generating your Loadero tests locally. By following the instructions provided in this blog post, you can use the test generator to create tests through the command line and modify their parameters as needed.
2. Test Case Manager – Clone/Sync to the Customer Project
Frequently, there arises a necessity to back up tests from Loadero, save them on your local machine, and restore them in a specific project. To facilitate this, the Loadero library provides functions for backing up and restoring tests, as well as two additional features, namely clone and sync. Clone first generates a backup, followed by restoring the tests to the intended project, while sync restores the tests to the destination project and then performs the backup from the project where the tests were already restored.
To set up the test manager entirely, you must configure the following environment:
Test Manager
Once the project has been established, you can utilize the test-manager.py module.
Here is a brief description of how test manager works:
python test_manager.py \
--access_token_from {ACCESS_TOKEN} \
--project_id_from {PROJECT_ID}  \
--action init
--log_level {LOG_LEVEL}
where
access_token_fromis the destination project’s access token (project that you want to initialize locally). You can find the access token (and create one, if needed) in the Loadero web app, by navigating to project settings and selecting the API access tab on the left.project_id_fromis the destination project’s ID.log_levelis an argument for debugging purposes that can be info, INFO, debug, DEBUG. The default value is info / INFO.
Important: Make sure that you initialize a local backup of the project first. This action should be performed for the previous part related to the Test Generator as well. To initialize the local backup run the backup action.
After initializing the project, a directory with name {project_id}_{project_name} and a file with name {project_id}_{project_name}.json will be created in test_cases directory.
Run the script with:
- Back up certain test(s) from source project:
python manage_tests.py \
 --access_token_from {ACCESS_TOKEN} \
 --project_id_from {PROJECT_ID}  \
 --test_ids {TEST_ID1} {TEST_ID2} {TEST_IDN} \
 --action backup \
 --log_level {LOG_LEVEL} \
 --delete_source_test {TRUE/FALSE}
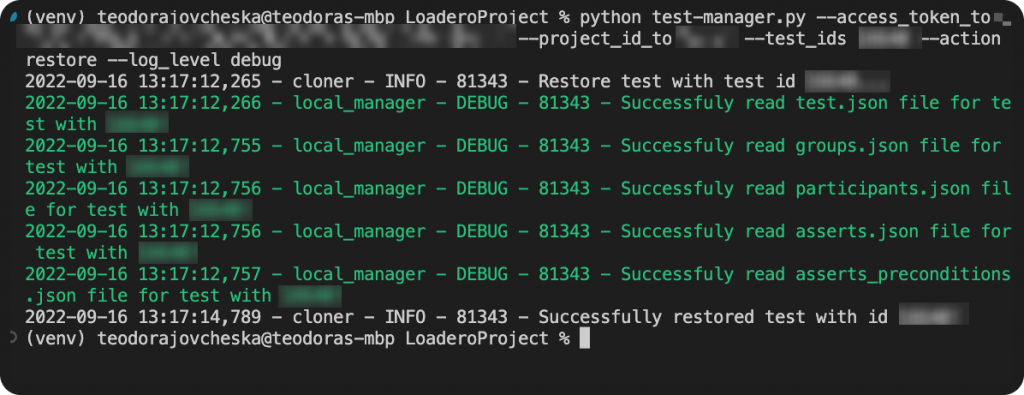
- Restore certain test(s) to destination project:
python manage_tests.py \
 --access_token_to {ACCESS_TOKEN} \
 --project_id_to {PROJECT_ID}  \
 --test_ids {TEST_ID1} {TEST_ID2} {TEST_IDN} \
 --action restore \
 --action log_level {LOG_LEVEL}
- Clone certain test(s) from source to destination project:
python manage_tests.py \
 --access_token_from {ACCESS_TOKEN}
 --project_id_from {PROJECT_ID}
 --access_token_to {ACCESS_TOKEN} \
 --project_id_to {PROJECT_ID}  \
 --test_ids {TEST_ID1} {TEST_ID2} {TEST_IDN} \
 --action clone \
 --log_level {LOG_LEVEL} \
 --delete_source_test {TRUE/FALSE}
- Sync certain test(s) from local to destination project:
python test_manager.py \
 --access_token_from {ACCESS_TOKEN} \
 --project_id_from {PROJECT_ID} \
 --access_token_to {ACCESS_TOKEN} \
 --project_id_to {PROJECT_ID} \
 --test_ids {TEST_ID1} {TEST_ID2} {TEST_IDN} \
 --action sync \
 --log_level {LOG_LEVEL}
where
access_token_fromis the source project’s authentication token.project_id_fromis the source project’s ID.access_token_tois the destination project’s authentication token.project_id_tois the destination project’s ID.test_idsare IDs from tests to be backed up and restored, and it is an optional parameter (if not specified, all tests will be covered).actioncan be backup, restore, clone (backup and restore) or sync (restore and backup).log_levelis an argument for debugging purposes that can be info, INFO, debug, DEBUG. The default value is info / INFO.delete_source_testcan be true or false. It refers only to backup and clone.
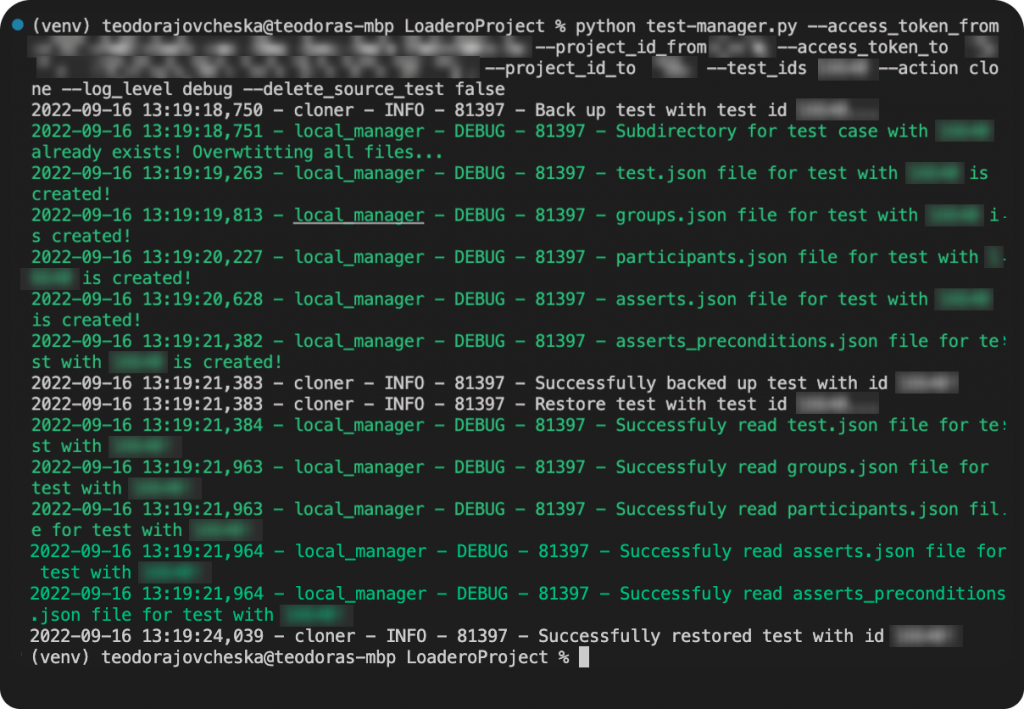
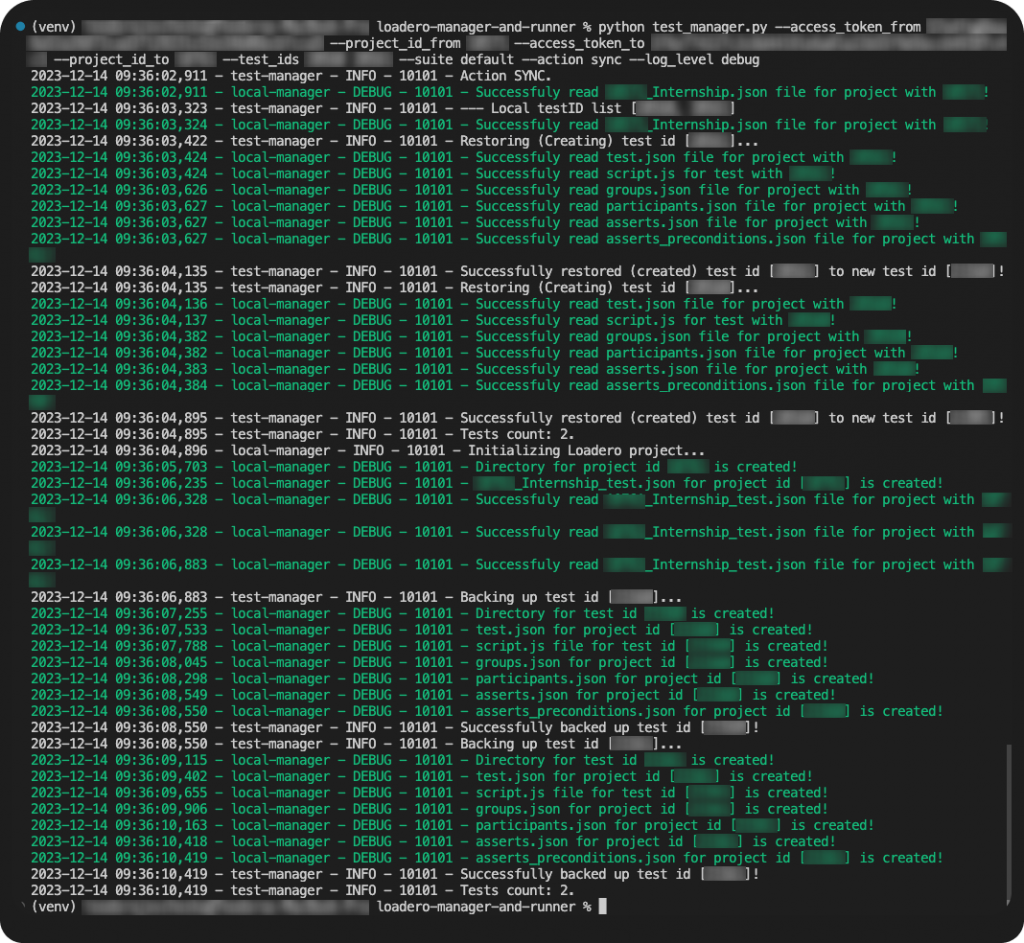
Once you run the script with a particular action you will be able to see the following result:
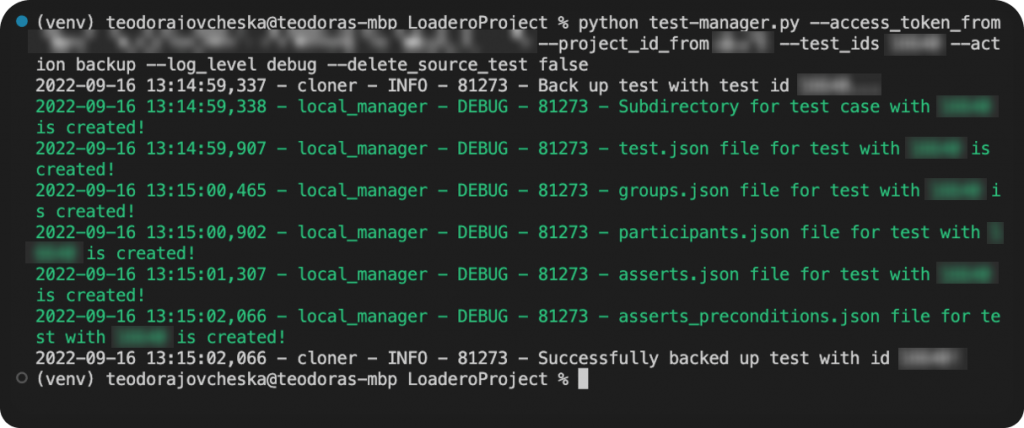
Note: If you perform a restore action and if a test with the specified ID already exists in the project, then that existing test will be updated instead of creating a new test in the Loadero project.
With these parameters in place, you can back up, restore, and clone tests between Loadero’s projects. Please note that the project must be established, and you must possess both the access token and project ID to execute these actions.
Loadero offers numerous features, including one that enables parallel test execution. As the project expands, and more tests are added, it becomes necessary to include them in groups and automatically handle test runs. To that end, the Loadero library provides a test runner module alongside test manager. This script enables you to initiate and execute multiple tests concurrently on Loadero, while obtaining separate results for each of them.
To configure the test runner completely, you must establish the following environment:
Test Runner
After setting up the project you can use the test-runner.py module.
Run the script with:
 python test_runner.py \
 --access_token {ACCESS_TOKEN} \
 --project_id {PROJECT_ID}  \
 --test_ids {TEST_ID1 TEST_ID2 TEST_IDN} \
 --timeout {TIMEOUT} \
 –log_level {LOG_LEVEL}
where:
access_tokenis the project’s authentication token.test_idsis a list of test IDs, which must contain at least one test ID.timeoutis an argument signifying the timeout of the script in seconds. The timeout must refer to the test with the longest execution time in the list, otherwise the script will end with a timeout and you can get incorrect test running results. The default value for the timeout is one hour.log_levelis an argument for debugging purposes that can be info, INFO, debug, DEBUG. The default value is info / INFO.
Once the script is launched, you will receive real-time updates regarding the running test’s status and the test results themselves.
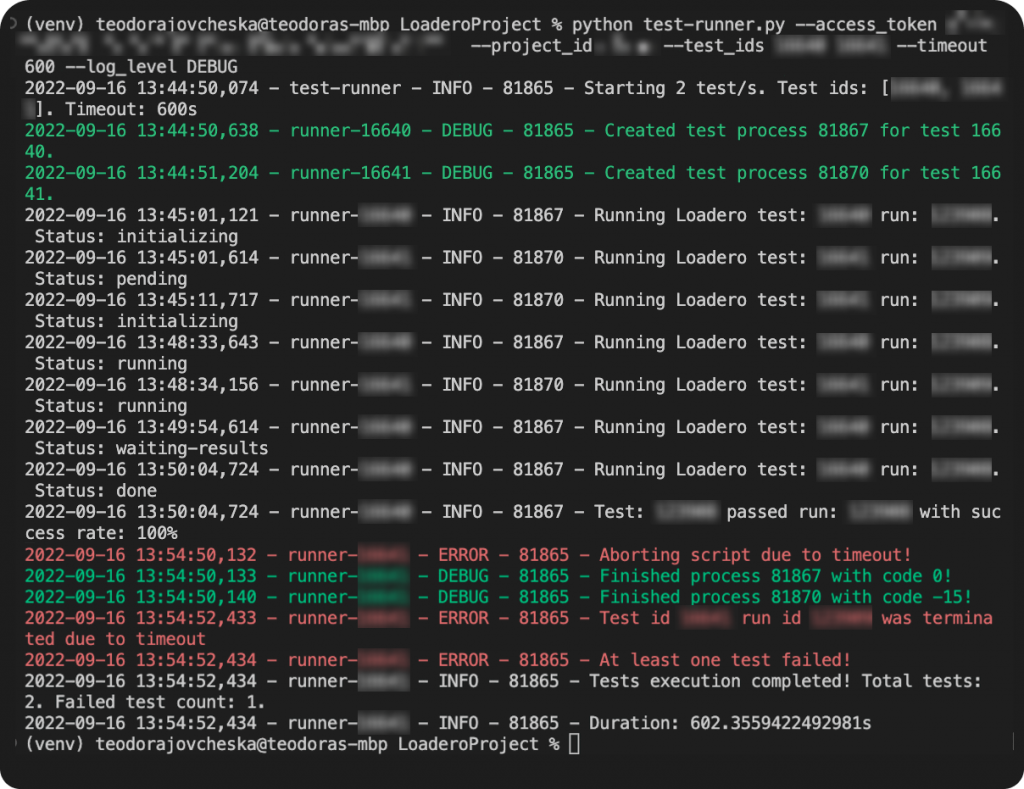
With this functionality, you can initiate the execution of multiple tests concurrently from your local machine and obtain local feedback regarding the execution status.
4. Statistics module to adjust asserts and find out test stability
Loadero provides comprehensive access to all parameters for a specific test run and offers extensive information about its execution. As a tester, it is essential to ensure the quality of the tests and the products being tested. This includes calculating various aggregate values (avg, max, etc.) of all test statistics obtained during test execution, such as the values for asserts. To facilitate this process, Loadero has incorporated a statistics module in its library. This module enables testers to iterate over N test runs with an offset and analyze assert problems and script problems, which are the most likely reasons for test failures.
To fully utilize the statistics module, the following environment must be set up:
Statistics
Once the Loadero library is set up, the loadero-statistics.py module can be utilized for further analysis.
Run the script with:
python loadero_statistics.py \
 --access_token {ACCESS_TOKEN} \
 --project_id {PROJECT_ID} \
 –-test_ids  {TEST_ID1} {TEST_ID2} {TEST_IDN} \
 -–n {NUMBER_OF_TEST_RUNS} \
 –-offset {OFFSET}
where:
access_tokenis the project’s access token and is required.project_idis the project’s ID and is required.test_idsis a list of test IDs and is optional. If it is not set the script will be executed for all tests in the particular project.ncorresponds to the number of test runs and is optional. If it is not set, it will be 100.offsetis the offset of test runs and is optional (will skip the latest n runs). If it is not set, it will be 1.
To begin with, upon executing the script a table will be generated, consisting of all the test cases along with their corresponding test IDs. The table below displays the information that can be obtained from the script execution.
| Number of total test runs | Number of selected test runs | Offset | Assert count | Average success rate | Assert problems | Script problems |
| 459 | 10 | 1 | 3 | 0.0 | 3 | 2 |
| 15 | 10 | 1 | 3 | 0.1 | 0 | 6 |
| 30 | 10 | 1 | 2 | 0.45 | 0 | 6 |
| 13 | 10 | 1 | 9 | 0.0 | 3 | 0 |
The table contains several columns, such as the number of total test runs, the number of selected test runs, the offset value, the number of asserts for the test, and the average success rate for that particular run. In addition, the table also provides information regarding two types of errors that might occur during the execution of the test cases: assert problems and script problems.
Depending on the type of error encountered during the execution of the test cases, appropriate measures should be taken:
- In the case of assert problems, the average values provided in the table obtained from the
loadero-statistics.pyexecution should be analyzed, and corrective actions should be taken accordingly. - In the case of script problems, debugging the script on both Loadero and locally is recommended. This will allow testers to identify and address any issues that might arise during the execution of the test cases.
Furthermore, executing the script will also generate a histogram of test failures. Images 8 and 9 display examples of such histograms, where the x-axis represents the test success rate and the y-axis represents the number of runs.
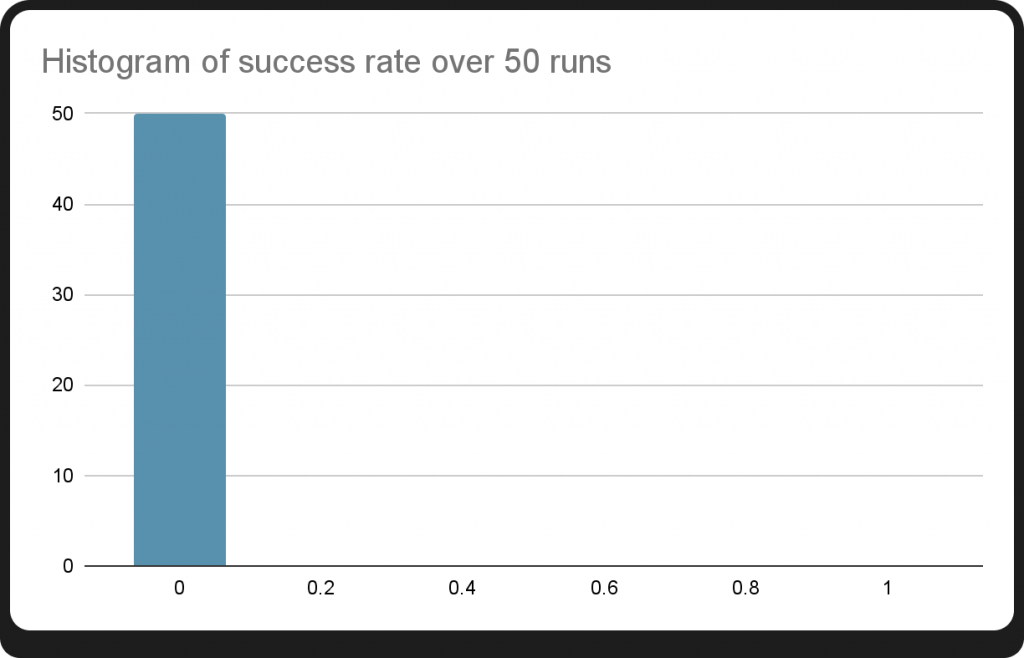
After an analysis of the histogram, it is apparent that all 50 runs of the specific test case resulted in failure. This is a clear indication that immediate corrective actions are required to rectify the situation and improve the overall success rate of the test cases. It highlights the significance of identifying and addressing issues promptly to avoid any adverse impact on the project’s outcomes.
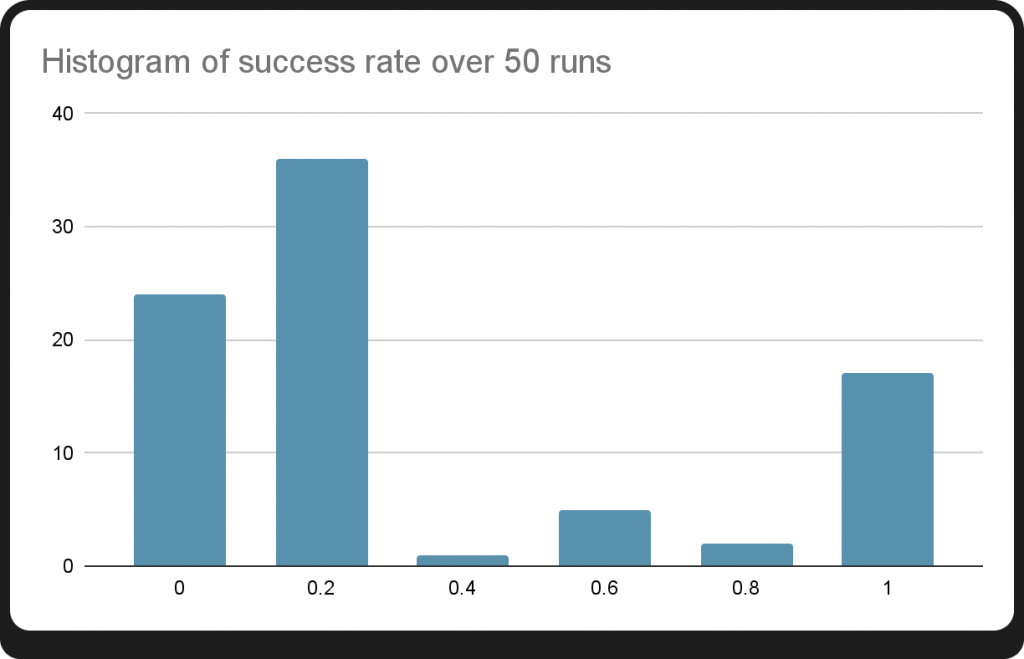
Within further assert analysis and multiple runs, the updated data reveals a notable increase in the success rate as depicted by the histogram. The persistence in running multiple tests and correcting any inconsistencies has resulted in an improved outcome, demonstrating the importance of thorough analysis in achieving optimal results.
Upon executing the script, a table will be generated that displays the average values of asserts for the last 10 test runs. This table can aid testers in identifying areas where corrective actions may be necessary.
| Path | Actual assert value | Operator | Proposed assert value | Average assert value | Standard deviation | Deviation percentage |
| webrtc/audio/bitrate/out/avg | 0.017 | gt | [8.405, 31.787] | 20.096 | 11.691 | 58.175 |
| webrtc/audio/packets/out/total | 20000 | gt | [16.789, 51.943] | 34.366 | 17.577 | 51.145 |
| webrtc/audio/packetsLost/out/percent | 100 | lt | [-0.312, 1.812] | 0.75 | 1.062 | 141.667 |
| webrtc/audio/rtt/avg | 1000 | lt | [61.421, 67.713] | 64.567 | 3.146 | 4.873 |
| webrtc/audio/jitter/out/avg | 1000 | lt | [0.223, 2.796] | 1.51 | 1.286 | 85.222 |
| webrtc/audio/bitrate/in/avg | 0.017 | gt | [8.396, 31.767] | 20.081 | 11.686 | 58.192 |
| webrtc/audio/packets/in/total | 19000 | gt | [16.853, 51.83] | 34.341 | 17.488 | 50.924 |
| webrtc/audio/packetsLost/in/percent | 100 | lt | [0.239, 2.943] | 1.591 | 1.352 | 84.971 |
| webrtc/video/bitrate/out/avg | 1.465 | gt | [-630.551, 4519.955] | 1944.702 | 2575.253 | 132.424 |
| webrtc/video/packets/out/total | 120000 | gt | [-80.406, 543.302] | 231.448 | 311.854 | 134.741 |
| webrtc/video/bitrate/in/avg | 1.465 | gt | [1613.1, 2419.29] | 2016.195 | 403.095 | 19.993 |
| webrtc/video/packets/in/total | 110000 | gt | [195.511, 285.075] | 240.293 | 44.782 | 18.636 |
| webrtc/video/packetsLost/out/percent | 100 | lt | [-1.508, 11.827] | 5.16 | 6.667 | 129.221 |
| webrtc/video/packetsLost/in/percent | 100 | lt | [-3.11, 18.11] | 7.5 | 10.61 | 141.467 |
| machine/network/bitrate/in/avg | 1562.5 | gt | [-510.942, 5141.396] | 2315.227 | 2826.169 | 122.069 |
| machine/network/bitrate/out/avg | 1562.5 | gt | [1772.567, 2770.068] | 2271.318 | 498.751 | 21.959 |
| machine/network/bytes/in/total | 146484.38 | gt | [-64.138, 643.023] | 289.443 | 353.58 | 122.159 |
| machine/network/bytes/out/total | 136718.75 | gt | [221.532, 346.195] | 283.863 | 62.332 | 21.958 |
| webrtc/audio/bytes/in/total | 1367.187 | gt | [1.049, 3.971] | 2.51 | 1.461 | 58.194 |
| webrtc/audio/bytes/out/total | 1367.187 | gt | [1.051, 3.974] | 2.512 | 1.461 | 58.172 |
| webrtc/video/bytes/in/total | 117187.5 | gt | [201.662, 302.462] | 252.062 | 50.4 | 19.995 |
| webrtc/video/bytes/out/total | 117187.5 | gt | [-78.775, 564.739] | 242.982 | 321.757 | 132.42 |
The table lists 22 asserts for a particular test, and provides information on each assert. Some examples:
- The average audio bitrate for the host (webrtc/audio/bitrate/out/avg) is set to be less than 0.017. However, after running the assertion over 100 runs, the calculated average value is 20.096, which indicates that the assertion needs to be adjusted. The proposed assert value falls within the range [8.405, 31.787], allowing for flexibility. As a rule of thumb, a 10% deviation from the threshold value is also acceptable.
- The average network bitrate (machine/network/bitrate/out/avg) expected value is set to be greater than .1562.5 This means that the average network bitrate value is within the acceptable range, and there is no need to make any assert corrections.
Finally, we can get a graphical representation of these values.
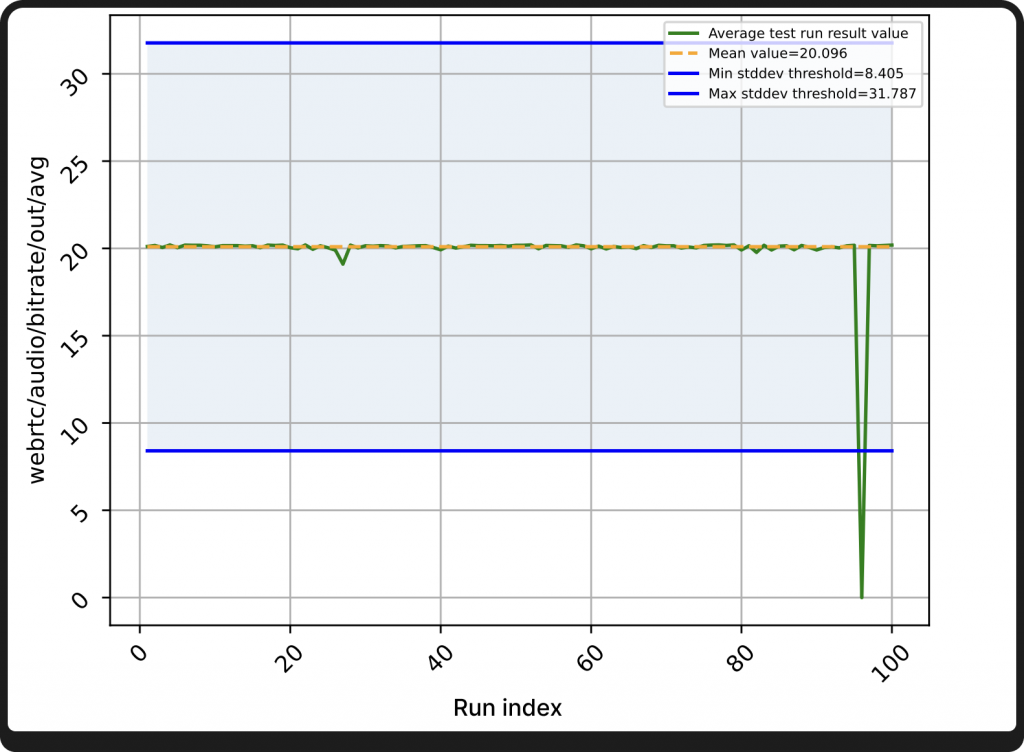
The provided chart displays three significant parameters – the average test run result, the mean value, and the standard deviation (marked light blue) from the mean value. By utilizing this chart, one can conveniently adjust the specific assertion after considering the average value in addition to the standard deviation.
Executing the statistics module can provide information to significantly improve the stability of your tests and also facilitate the identification of issues with the product you are testing. However, even after performing the necessary correction, if the asserts persist in failing, it is advisable to report the problem to the relevant product authority.
5. Conclusion
Within this blog post we have aimed to inform you on how to use various modules to generate, manage, and execute tests, as well as analyze the results. The scripts provided in this article enable you to create new tests via the Command Line Interface using the test generator module, backup and restore tests with the test manager module, and concurrently execute multiple tests with up to multiple thousands of participants on Loadero via the test runner module. Additionally, the statistics module aids in adjusting asserts, enhancing test stability, and improving the quality of the product under test.


