

One of the most important aspects of automated web application testing is having a good grasp of using locators. Locators allow retrieving DOM elements from the web page. Interacting with web elements during automated tests allows to create end-to-end tests that simulate real users behavior. In this blog post, we will talk about two types of locators – CSS selectors and XPath.
CSS selectors
CSS selectors are used to identify styled elements on a web page, since most HTML pages are styled with cascading style sheet (CSS) classes. The selector consists of a pattern that is used to find matched DOM elements in the document tree. CSS comes with an incredibly rich set of selectors, and those selectors can be mixed and matched in interesting ways.
There are 3 types of CSS selectors:
Simple CSS selector
The most straightforward selectors target a specific tag, id or class on a web page:
a#submit-button.nav-bar
In CSS, classes and IDs play pretty much similar roles, but there are some differences. Both are used to target elements on the web page. However, an ID can be assigned only to a single element, when a specific class to a multiple. Using classes allows you to target a group of elements. Tags are used to create HTML elements that we can target using a tag selector too.
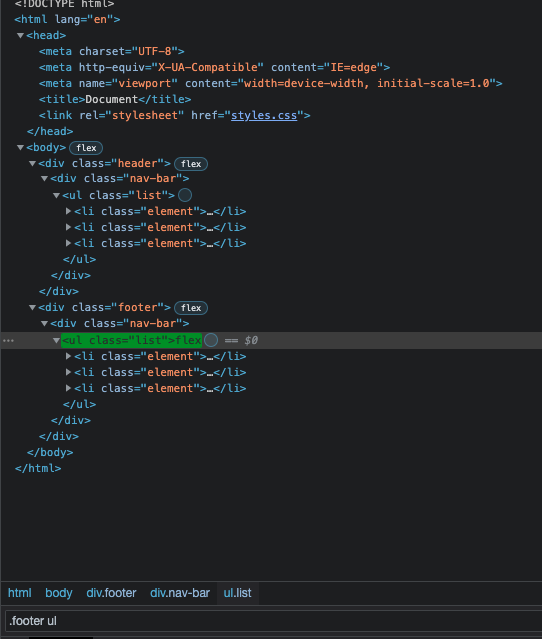
Some elements might appear in different places on a web page. Let’s say, we want to select an unordered list only in the footer? Well, we could do that using a combinator:
.footer ul
By putting space between two selectors, we are combining two selectors in a very specific way, saying that we are only targeting an unordered list that is nested within an element with the .footer class.
The term “combinator” refers to a character that combines multiple selectors. In this case, the space character combines .footer class and ul tag to create a descendant selector. The descendant selector will apply to all descendants, no matter how deeply nested they are.
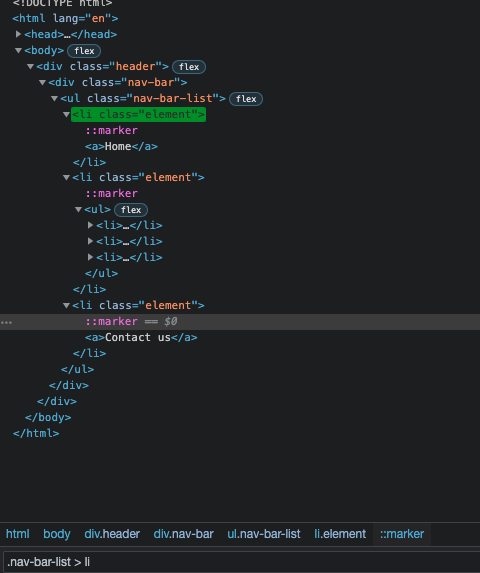
If we only want to select children of an element without targeting all descendants, we can achieve this by putting angle brackets between two (or more) selectors:
.nav-bar-list > li
By using this combinator we select only direct children of the .nav-bar-list selector, even if it has another set of li elements nested deeper, so only three elements will be selected.
There are also other combinator types such as + and ~ which can be used to construct more complex queries. You read about them here.
Pseudo selectors
Pseudo selectors let us locate elements based on their current state, position within the document tree, and much more.
HTML comes with interactive elements like buttons, links, and form inputs. When we interact with one of these elements (either by clicking on it or tabbing to it), it becomes focused. It’ll capture keyboard input, so we can type into a form field or press “Enter” to follow a link. Or, let’s say you hover over a button and it changes its background or text colors. In both cases, the pseudo-classes will be applied to those elements.
To target a button that is in the hovered state, we can write our selector like this:
button:hover
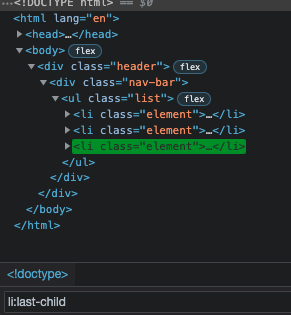
Pseudo selectors also allow us to select elements by using their position in the document tree. Imagine, we have an unordered list and we want to select the last list item of the list.
To achieve this we can use the pseudo selector :last-child that will select the last child of <ul> element:
li:last-child
Of course, there are many other pseudo-classes available and to learn more about them you can check out this awesome resource.
Attribute CSS selectors
The attribute selectors can be used to target elements with specific attributes. The following examples will show you that this type of selector can be very flexible.
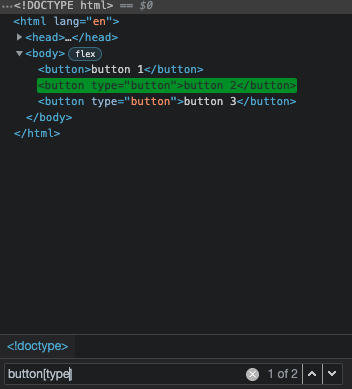
To select all elements with the specific attribute we can write our selector using a tag name followed by a pair of square brackets with the name of an attribute inside them:
button[type]

This will select all buttons that have the type attribute, no matter what value that attribute holds. To target elements with attributes that hold exact values we can rewrite our selector like this:
button[type="submit"]
To select elements with attribute values that contain specific words, we can put the tilde sign after the attribute name:
img[alt~="year"]
If we want to find elements whose attributes begin with specified values, we can put a caret after the attribute’s name:
.div[class^="nav"]
By using a dollar sign we can select elements with attributes that end with a specified value:
.div[class$="bar"]
To select elements with attributes that contain a specified list of characters, we can use an asterisk sign:
.div[class*="av"]
XPath
HTML and XML have a very similar structure, so XPath (XML path language) can be used to navigate through web pages written in HTML or XML. XPath uses path expressions to navigate through elements and attributes on a web page.
One of the main advantages of XPath over CSS selectors is that it allows you to traverse elements up the DOM tree, meaning that by selecting an element you can also target parent and other ancestors. Of course, with XPath, you can also go down the document tree and target children and their descendants. XPath has many built-in functions such as locating elements by text. Imagine a situation when HTML elements are being built dynamically but the text stays consistent, in that case, the only way of targeting those elements would be to find them by text. This is something you cannot do with CSS selectors.
Tip: Bear in mind that each browser engine has its own implementation, so some expressions can be inconsistent when used with different browsers.
Before jumping into syntax and expressions, let’s quickly take a look at the terminology used when working XPath:
In XPath we are working with nodes. An HTML document is made up of a tree of nodes. A node can be either an element, attribute, or text. The topmost element of the document tree is called the root element, or the root node.
Let’s image the following HTML structure:
<div class=”header”>
    <div class=”nav-bar”>
        <ul class=”list”>
            <li class=”list-element”></list>
            <li class=”list-element”></list>
        </ul>
    </div>
</div>
When we have one element nested within another, we can say that the nested element is a child of a parent element. If a child has also nested elements, then we can say that those elements are descendants of the topmost element. Or, similarly, we can say that the topmost element is an ancestor of deeply nested elements.
In the above example, elements with class .list-element are descendants of the .header element. At the same time, the .header element is an ancestor of <li/> elements
Let’s take a look at XPath syntax for selecting nodes on a web page:
| Expressions | Description |
| nodeName | Selects all elements with the specified node name |
| / | Select elements starting from the root node |
| // | Selects all elements that match the specified selection |
| . | Selects the current element |
| .. | Selects the parent of the current element |
| :: | Selects children of the current element |
| @ | Selects attributes |
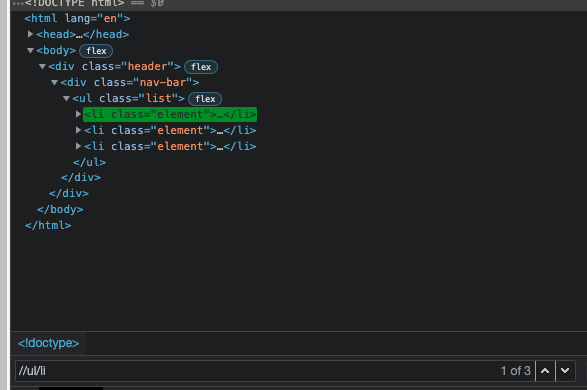
In the following example, to select all elements that are descendants of an unordered list, you can write the following expression:
//ul/li
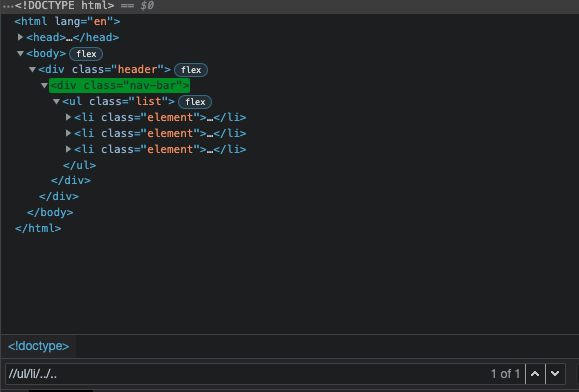
By using two dots you can go up the document tree and select the ancestors of the list item:
//ul/..
Xpath also allows you to use predicates to select specific elements on a page or elements with specific values. Predicates are denoted with a pair of square brackets.
Let’s say you want to select the very first <li> element within the unordered list. To achieve this, the expression will look like this:
//ul/li[1]
If you need to select the last element in the unordered list, you can rewrite the expression by changing the predicate value to last():
//ul/li[last()]
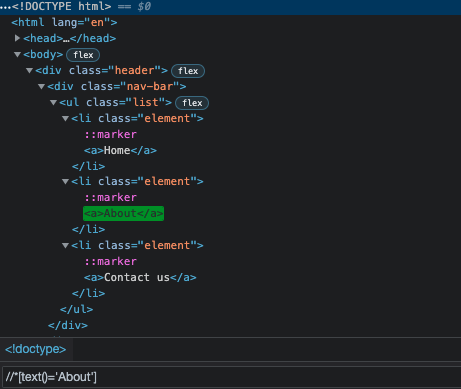
For selecting an element by the text node, you can use the following expression:
//*[text()='a']
I have shown you the examples of using selectors in the Google Chrome dev tools, but the idea is similar when you write your automation scripts. I will use the Nightwatch testing framework to write the following snippets which will navigate to some webpage, wait to ensure that an interactive element has appeared in the DOM, and finally click on it. If you want to learn using Javascript with Nightwatch framework for your automated tests, you can start with our guide to this.
CSS selector:
(browser) => {
  browser
    .url("<your url>")
    .waitForElementVisible('button[type="submit"]', 1000)
    .click('button[type="submit"]');
};
XPath Selector:
(browser) => {
  browser
    .url("<your url>")
    .useXpath()
    .waitForElementVisible('//ul/li[last()]', 1000)
    .click('//ul/li[last()]');
};
As you can see XPath selectors can be very flexible in terms of traversing the DOM and selecting elements, however complex expressions might look rather complicated and difficult to read. Of course, XPath has some more advanced features such as wildcards and several path selections that we didn’t talk about in this blog post, but having an understanding of its basic features will give you a good start in learning about this type of locators.
Conclusion
To sum up, CSS selectors are faster, easier to write, and more reliable across browsers, so they can be a perfect choice when you need to write a quick query that doesn’t require navigating up the hierarchical tree of the DOM. With the introduction of pseudo-selectors such as :nth-child, the traversal through elements with CSS has gotten much simpler. However, if you need to query an element by text or need to target ancestors of an element that will require you to go up the DOM tree, then you will be better off using Xpath.


