

Quite often we get requests to provide support to migrate tests from the testRTC testing tool to our service. We try to provide support to our users to help make this transition as easy and flawless as possible. To ease the process further for other users with similar needs this blog post was created. If you are already in the progress of migration or just planning and estimating how big of a task this is, make sure to learn from our experience, this could be valuable to better understand how Loadero functions and how you can get maximum value from running your tests with us!
Why migrate your testRTC tests to Loadero
There are numerous reasons why our customers decide to migrate their tests and run them in Loadero. Some do this just for exploration – becoming stagnant in the testing process evolution could impact what you get for your money in the long run. That is why just trying out how other services work compared to the one you are using currently can give a great perspective on how your application behaves in different runtimes. Others look for ways to make their testing more cost-effective and see the value in Loadero’s paid plan that allows running 2-hour long WebRTC tests for as little as 0.15$ per simulated user. We believe that it is always a good idea to try different services and decide which one fits your needs best. Regardless of your motivation to run your testRTC test in another tool, we want to make it a rather simple task, so you don’t have to spend hours or days just on the PoC. So keep reading if you consider migrating your test.
Tip: In Loadero you are not limited by NightWatch(Javascript). If you are more comfortable with creating a test script in Java or Python, Loadero allows that. You will have to rewrite your test script in another language instead of just reusing the existing one, but it will pay off with your work on test script maintenance being more convenient in the future.
Quick vocabulary comparison
Each cloud testing service comes up with naming that they find the most suited. In most cases, different terms in different services correspond to the same thing. So let’s start with a small comparison of how we call things and how testRTC does it.
| Loadero | testRTC |
| Participant | Agent, Probe |
| Network conditions | Network profile |
| Assert | Expectation |
| Participant group | Session |
| Participant count in the test | Session size |
| Compute unit | Probe type |
Asserts and preconditions
In Loadero we allow users to set performance expectations as post-run asserts. In comparison, our asserts are defined in test settings and provide a full list of all possible metrics that can be used. So you don’t have to write them in the script. In more complex tests these asserts in the script can clutter the script and introduce possible typos making the script invalid, but in Loadero we try to minimize the possibility of that happening and allow users to set all the expectations easily. We use the assertions a lot to set expectations for both WebRTC metrics and machine metrics. You can learn more about the use of the assertions in your tests from this post, but if you skip adding asserts to your newly migrated test, make sure to remove all the Expectations from your test script.
To provide dynamic asserts (not all test participants have the same expected values), we allow setting assert preconditions which will filter out the required asserts for each participant separately. Preconditions can be set on one or multiple metrics, for example on browser version, location, and used webcam media.
Additionally to that, there also are runtime asserts, which are executed in the script runtime and can impact the Selenium result, while post-run asserts are executed/calculated after the test run. You can use your runtime Nightwatch asserts in Loadero the same way you use them in your test scripts in testRTC, so you can just keep them without any changes.
Environment constants and variables
Similarly to what you have in testRTC, Loadero also provides environment variables and constants that will describe the test and participant configuration. For example to get the name of the participant that is running the script you could use participant.name from client.globals directive: client.globals.participant.name. This would be the equivalent of process.env.RTC_AGENT_NAME from testRTC. Here is a table that you can use to find the exact variable equivalents to replace in your migrated test script:
| Loadero | testRTC |
| – | process.env.RTC_SERVICE_URL |
| client.globals.test.name | process.env.RTC_TEST_NAME |
| client.globals.participant.name | process.env.RTC_AGENT_NAME |
| client.globals.test.totalParticipants | process.env.RTC_AGENT_COUNT |
| – | process.env.RTC_AGENT_NUM |
| – | process.env.RTC_SESSION_SIZE |
| – | process.env.RTC_SESSION_COUNT |
| client.globals.group.id | process.env.RTC_SESSION_IDX |
| client.globals.group.name | process.env.RTC_SESSION_NAME |
| client.globals.participant.id | process.env.RTC_IN_SESSION_ID |
| – | process.env.RTC_TEST_SCRIPT_NAME |
| client.globals.test.participantTimeout | process.env.RTC_TIMEOUT |
| – | process.env.RTC_OS |
| client.globals.location | process.env.RTC_LOCATION |
| client.globals.browser | process.env.RTC_BROWSER |
| client.globals.network | process.env.RTC_NETWORK_PROFILE |
| – | process.env.RTC_FIREWALL_PROFILE |
| client.globals.run.id | process.env.RTC_TEST_RUN_ID |
| – | process.env.RTC_RUN_TYPE |
| – | process.env.RTC_RUN_COUNT |
| – | process.env.RTC_EXTRA_TABS |
Network setting changes
In Loadero network settings can be selected and changed in a similar manner as other competitors including testRTC. In Loadero, network conditions are set for each participant when you configure the test participant, but it’s possible to change it in runtime using our custom NightWatch commands. You can find a visual representation of how it can be done in our blog post about custom network settings.
To update the network settings in runtime you can use our updateNetwork function which supports preset values we have made and also custom settings defined by you! This function effectively replaces testRTC’s rtcSetNetwork and rtcSetNetworkProfile. The format of the function should be: client.updateNetwork((networkMode: string), (config: object));.
Here is a sample of how it can look in code:
client => {
    // Example of updating network conditions
    client
        .url("https://google.com")
        .waitForElementVisible("body", 10000)
        .updateNetwork(loaderoConstants.network.mobile_3g);
}
Test configuration
The test setting up process in Loadero is fundamentally different from testRTC. We have compartmentalized different test parts into separate sections. You can find step-by-step instructions to configure a test in Loadero here, but in a quick glance, you might notice that each test has its own main details, and only then groups and participants within these groups are defined which is quite a bit different from testRTC’s approach. So to migrate your test we suggest you do it in the following order.
1. Add your test script and set test parameters
The test’s main details include these required fields – test name (title), script, test mode, increment strategy, start interval and participant timeout. For ease here is the advice to follow while migrating your test:
Script
- Remove the Expectations
- Remove asserts from the test script
- Change the constants and variables to the ones available in Loadero
- Remove or replace
rtc*functions to Loadero equivalents
Test mode
- If your test will have 50 participants or less choose the Performance test mode, for higher numbers use the Load test mode.
Increment strategy
- Pick the Linear participant option (it will make test participants join the test one by one with equal delays).
Start interval
- For smaller tests with 1-50 participants set the interval to 1-5 minutes.
Tip: Start interval is the total amount of time in which all participants start their tests and access the service. The delay between participants depends on how long of a start interval has been set as well as on the increment strategy chosen.
Participant timeout
- Set the Participant timeout to be a few minutes longer than your expected test execution time.
Tip: Participant timeout specifies the time limit after which the test will be terminated for a test participant if it hasn’t finished naturally yet.
2. Create participant groups
In Loadero you can have participants grouped. Create your first participant group for which you only need to fill in the name and count.
Tip: The count is effectively a multiplier for the number of participants within the group. If a group has a count of 2 and it contains 10 participants, then in total 20 participants will be run in the test.
3. Create test participants in the groups
When creating participants, you have options to select the browser version (we provide 5 latest browser versions for Google Chrome and Mozilla Firefox), location, network configuration, media settings, and also compute units (describes how much computing power the participant will have). We have described all of these fields in our wiki, check it out here. And if you ever have trouble deciding what is the appropriate compute unit value for participants, we have made a blog post to make the decision a little bit easier.
Migrating a script
Let’s migrate one of testRTC’s sample scripts. For the Loadero use case, Jitsi example will be the best fitting to migrate. For reference, the script that is used in Jitsi looks like this:
// Variables that we will use in this example
var roomUrl = process.env.RTC_SERVICE_URL + "testRTC000" + process.env.RTC_SESSION_IDX + '?key=datacenter:East-US&key=company:testRTC';
var sec = 1000;
var agentType = Number(process.env.RTC_IN_SESSION_ID);
var sessionJoinRate = 500;
var agentName = process.env.RTC_AGENT_NAME;

// We set a few expectations. If these don't happen, the test will fail
// In Jitsi case, we want to make sure we have:
// 1. At least 2 incoming A/V channels
// 2. No more than 2 outgoing A/V chanels (2 due to Jitsi's P2P4121 mode)
// 3. Media being sent and received
client
    .rtcSetTestExpectation("audio.in >= 1")
    .rtcSetTestExpectation("audio.out >= 1")
    .rtcSetTestExpectation("video.in >= 1")
    .rtcSetTestExpectation("video.out >= 1")
    .rtcSetTestExpectation("audio.in.bitrate > 0")
    .rtcSetTestExpectation("audio.out.bitrate > 0")
    .rtcSetTestExpectation("video.in.bitrate > 0")
    .rtcSetTestExpectation("video.out.bitrate > 0");

// Join the room
client
    .pause(10 * sec)
    .rtcInfo(roomUrl)
    .resizeWindow(1280, 720)
    .rtcProgress('open ' + roomUrl)
    .pause((sessionJoinRate * agentType) + 10)
    .url(roomUrl)
    .waitForElementVisible('.prejoin-input-area .field', 60 * sec)
    .pause(300) //wait for page render
    .setValue(".prejoin-input-area .field", process.env.RTC_AGENT_NAM)
    .pause(300)
    .click('.prejoin-input-area div[role="button"]')
    .pause(300)

    // Now that the browser is connected and in the room, we wait
    .pause(60 * sec)
    .rtcScreenshot("in session")

    /*    //Now Lets switch to a 3G network
        .rtcSetAdditionalInfo("Network degrades to Regular 3G mid call")
        .rtcEvent("Network 3G", "global")
        .rtcSetNetworkProfile("Regular 3G")
        .pause(30 * sec)
        .rtcScreenshot("3G")*/
    .pause(60 * sec)

    .rtcProgress("Bye");
Before we continue, here are the steps we need to take for the migration to be successful
- Switch variables from using the
process.envpredicate toclient.globals - Remove
rtcInfofunction calls - Switch
rtcScreenshotfunction tosaveScreenshot - Switch
rtcSetNetworkProfilefunction toupdateNetwork - Remove
rtcSetTestExpectationfrom the script and create asserts
As long as the script itself goes, it would look like this:
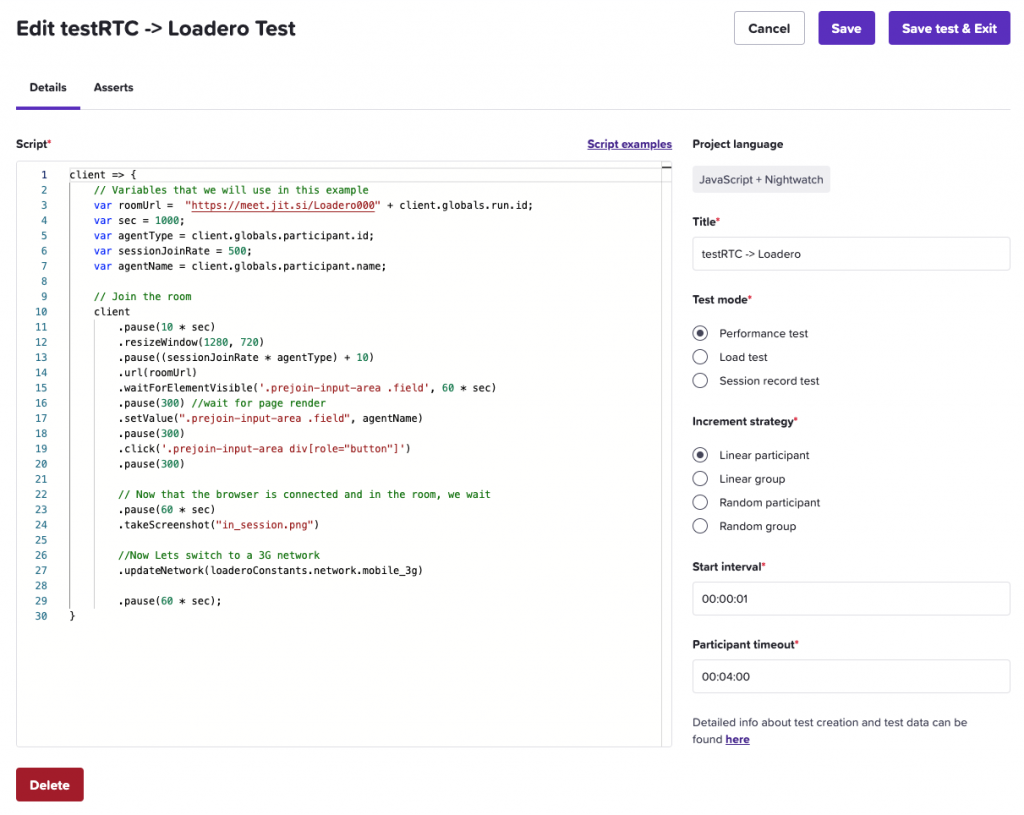
client => {
   // Variables that we will use in this example
   var roomUrl =  "https://meet.jit.si/Loadero000" + client.globals.run.id;
   var sec = 1000;
   var agentType = client.globals.participant.id;
   var sessionJoinRate = 500;
   var agentName = client.globals.participant.name;

   // Join the room
   client
       .pause(10 * sec)
       .resizeWindow(1280, 720)
       .pause((sessionJoinRate * agentType) + 10)
       .url(roomUrl)
       .waitForElementVisible('.prejoin-input-area .field', 60 * sec)
       .pause(300) //wait for page render
       .setValue(".prejoin-input-area .field", agentName)
       .pause(300)
       .click('.prejoin-input-area div[role="button"]')
       .pause(300)

       // Now that the browser is connected and in the room, we wait
       .pause(60 * sec)
       .takeScreenshot("in_session.png")

       //Now Lets switch to a 3G network
       .updateNetwork(loaderoConstants.network.mobile_3g)

       .pause(60 * sec);
}
When creating the test, for this scenario we will be setting these settings:
- Title: testRTC -> Loadero
- Test mode: Performance test
- Increment strategy: Linear participant
- Start interval: 00:00:01 (1 second)
- Participant timeout: 00:04:00
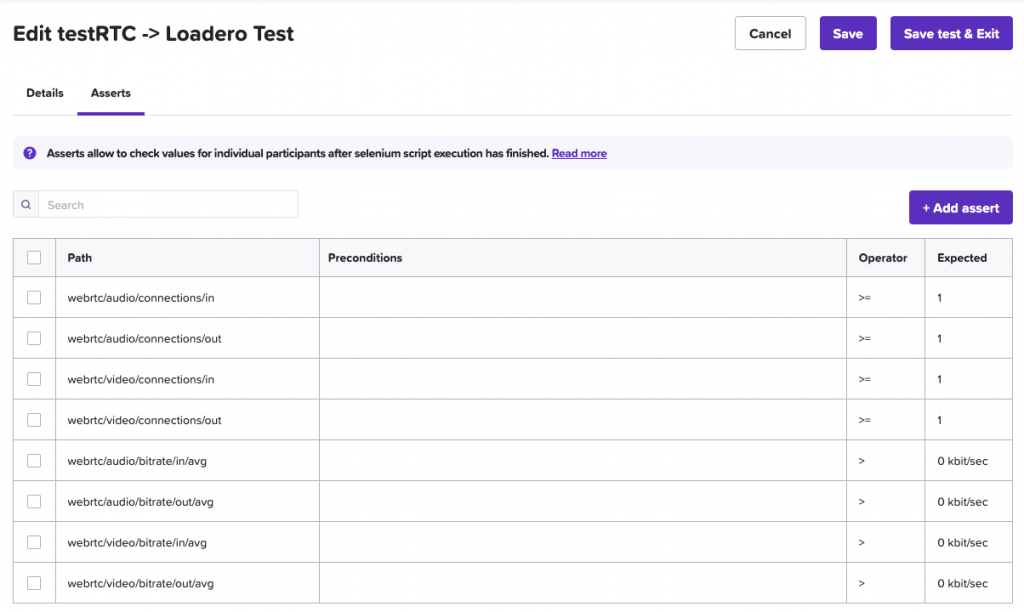
After this is done, the next step would be adding asserts. This can be easily done by switching to the “Asserts” tab and pressing the “Add assert” button, after which a menu popup will appear and make you pick 3 required values – Path, Operator, and Expected. We will be creating 8 asserts that will be the same as the ones in the testRTC script.
- webrtc/audio/connections/in >= 1
- webrtc/audio/connections/out >= 1
- webrtc/video/connections/in >= 1
- webrtc/video/connections/out >= 1
- webrtc/audio/bitrate/in/avg > 0
- webrtc/audio/bitrate/out/avg > 0
- webrtc/video/bitrate/in/avg > 0
- webrtc/video/bitrate/out/avg > 0
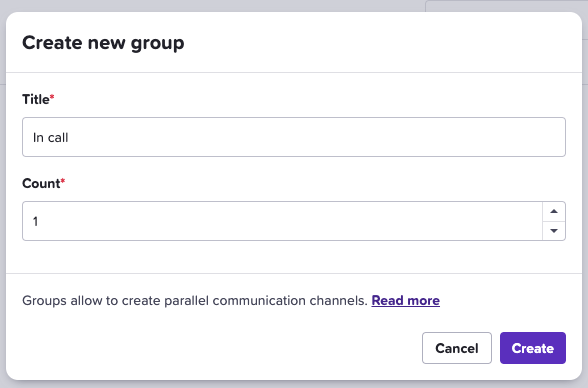
After this is done we can save the test and start setting up the test participants. To do this, we first must create a group that will hold these participants. If you just now created the test, you will be automatically redirected to the groups view, if you already have created the test – then navigate to the tests list and click on the test you would like to modify. When in groups view, click the “New test group” button, which will open a small popup menu that requires you to type in the group name and count.
When you click on the “Create” button, then you will be redirected to the “Participant list”, then once again click on the “New test participant” button. These are the values that we will be using for participants:
- Title: Latest
- Count: 2
- Compute unit: G2
- Browser: Latest Google Chrome
- Location: US West – Oregon
- Network conditions: Default network settings
- Media: 720p marked video + -50dB audio feed
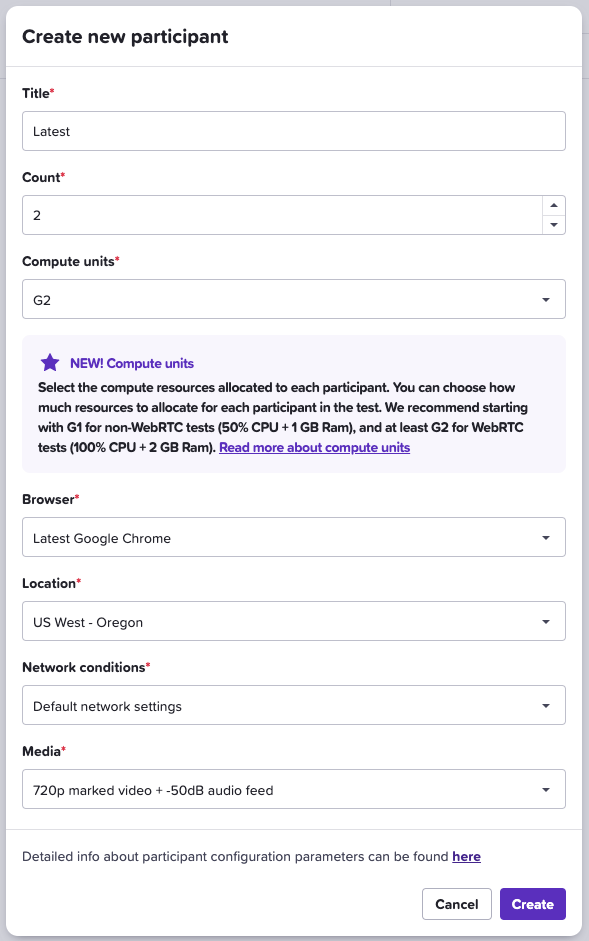
Congratulations! When you press the “Create” button, we are done and you can press the “Run test” button.
Migration checklist
Here is a quick checklist on what are the main points that have to be taken care of for the test to be able to run in Loadero.
Tip: For simple tests that do not use testRTC runtime-made functions and constants most likely no changes in the script itself will be required and it can be just copy-pasted into Loadero.
- Remove Expectations from the test script
- Change environment constants and variables
- Set all the test parameters
- Set Expectations as asserts
- Create participant groups and configure participants
- Check if your test is ready to run by following these guidelines
If you follow the instructions from this blog post you will be able to recreate your testRTC test in Loadero fairly quickly and easily. Loadero’s free trial will allow you to run the test multiple times with more concurrent test participants. After the test runs in the free trial you will get the same full reports as any of our paid plans provides, so you can explore them and see the value of those for yourself. If you need some help or have any questions while starting to use Loadero, feel free to use the support webchat to contact us, we are here to help you.


