
")
There are many programming languages that can be used for test automation. Loadero supports 3: Java (TestUI framework), Python (Py-TestUI framework), and JavaScript (Nightwatch.js framework). Test automation with Java is quite popular, in fact, the second most popular framework of choice when it comes to writing test scripts in Loadero is TestUI. In this blog post, we’ll describe the basics, most commonly used elements, and methods and give an example of a test script written in Java with TestUI.
TestUI combines 2 different paradigm test automation frameworks, i.e., mobile (Appium) and desktop (Selenide), into one neat framework. In our opinion, it’s a great framework that offers vast functionality with easy-to-learn syntax, not to mention full access to Selenide methods in case something tricky needs to be done.
If you are hearing about this framework for the very first time, welcome, we’ll explain everything you need to know to write a script and launch a test in Loadero successfully. Those who have heard about it, don’t leave (you might get a cookie if you stick with us) because you might learn something new.
Without further ado, the topics of this article are the following:
- Defining elements in TestUI
- Available element methods
- Available assertions
UICollectionsand their methods- Putting everything together and configuring a test in Loadero
Quick note, in the scope of this article, we’ll be focusing only on desktop web automation as this is what Loadero allows to automate at scale for your performance and load tests.
In this article, we will be automating the Wikipedia page. All of the code is available in our GitHub repository here.
Defining elements in TestUI
First, in order to create a test script for the web UI automation, we have to understand how to use selectors in the test scripts. Elements in TestUI stand for HTML elements. To create one, use the static function E(By element) that returns an object of type UIElement. This function requires passing any of the following locator methods:
byCssSelector(String cssSelector)– finds an element using a CSS selector.byId(String id)– finds element using ID attribute.byAttribute(String attribute, String value)– finds an element that has the exact attribute and value.byName(String name)– finds an element that has the provided name attribute.byValue(String value)– finds an element that has the provided value attribute.byXpath(String xpath)– finds element using XPath selector.byText(String text)– finds elements by the provided text.
If your CSS and XPath selector skills are a bit rusty, check out this “CSS Selectors And XPath Locators In Selenium Test Automation Scripts” guide to freshen up your memory.
Tip: We recommend saving E() function’s return value to reuse the element in further script actions.
Let’s define some elements for Wikipedia’s main page that we can use in our test script later!
// HTML elements that will be used
UIElement searchInput = E(byCssSelector("input#searchInput"));
UIElement searchButton = E(byId("searchButton"));
UIElement todaysArticle = E(byCssSelector("#mp-tfa p"));
UIElement pageContainer = E(byId("content"));
Available element methods
Alright, once we have defined the elements, we should do some actions with them. TestUI provides more than 50 methods that every UIElement object has (the full list is available here) but let’s look at the most crucial and frequently used ones:
click()– clicks on the provided element.getText()– retrieves text for theUIElementobject.sendKeys(String keys)– method to input content in editableUIElementobject text fields, for example, when automating a website that requires email and password to log in, this method will be used to input the text in email & password fields.saveScreenshot(String filename)– saves a screenshot of the current browsing context to a PNG file, that can be later downloaded in Loadero’s participant results artifacts tab. Keep in mind that the .png extension added for your screenshots’ name is necessary.
Tip: sendKeys() method also can be used to input keyboard keys, such as “ESC” or “ENTER”, for example, sendKeys(Keys.ENTER).
Let’s have a look at a code snippet for automating the Wikipedia page and see how all of it works together – we firstly get the text of todaysArticle, then search for Wikipedia posts by keywords “Selenium Webdriver” and then we make a screenshot of the returned results:
String text = todaysArticle.getText();
System.out.printf("Todays featured article is:\n %s\n", text);

// input text in the search input field
searchInput.waitFor(10).untilIsVisible().sendKeys("Selenium Webdriver");
searchButton.click();
// alternative: searchInput.sendKeys(Keys.ENTER);

//take a screenshot
pageContainer.waitFor(10).untilIsVisible().saveScreenshot("screenshot.png");
Here is the taken screenshot, that would be available in Loadero’s participants’ artifacts tab:

Available assertions
The use of assertions allows to check elements on the screen, make the test more insightful, and stop it if something goes wrong. Generally, it’s a good practice for creating a test script that we in the Loadero team use a lot and in almost every Java test automation script we create for our customers. There are two types of UIElement assertions available: shouldBe()/shouldHave() and waitFor() (list of available assertions here).
shouldBe( )/shouldHave( )
These assertions validate what an element should be or what it should have. The test fails if the element doesn’t meet the given condition. For example, if `element` is not rendered on the website when element.shouldBe().visible() function is called, then the test will immediately stop its execution and TestUI will report the error.
All of the available assertions are called via functions shouldBe() and shouldHave() that can be used interchangeably and they both have the following methods (the full list can be found here). We use the following assertions most often:
visible()– checks if the element is visible to the user.enabled()– checks whether the element is enabled, e.g., whether a checkbox is marked.exists()– validates whether the element exists in HTML DOM.exactText(String text)– checks if the element’s text is the same as the passed text argument.value(String text)– compares if the element’s value attribute has the same value as the provided argument.attribute(String attribute).equalTo(String value)– checks whether the given attribute is equal to the provided value.theAttribute(String Attribute)– validates if the element has such an attribute.
waitFor(int seconds)
Unlike shouldBe() and shouldHave() functions that immediately check if the element matches the condition, waitFor() will wait for the provided time (in seconds) until the element meets the expected state. TestUI offers the following states to validate (the full list of available methods can be found here):
untilIs(Not)Visible()– waits until the element is/isn’t visible.untilIs(Not)Enabled()– waits until the element is/isn’t enabled.until(Not)Exist()– waits until the element exists/doesn’t exist in HTML DOM.untilHas(Not)Text(String text)– waits until the element has/doesn’t have the provided text.untilHas(Not)Value("someValue")– waits until the element has/doesn’t have avalueattribute with the provided value.
Tip: To assert the opposite .not() should be chained before the assertion method, like untilIs.not().visible().
Tip: All of these functions return the same element for which these functions were called, hence element methods can be chained to the assertions. We recommended calling waitFor().untilIsVisible() before all interaction functions to ensure that the element is truly interactable, i.e., visible, before doing any actions with it. See the code snippet from the automated Wikipedia page below:
open("https://en.wikipedia.org/wiki/Main_Page");
pageContainer.waitFor(10).untilIsVisible();
UICollection and its methods
UICollection is a list of UIElements that can store multiple UIElement-type objects. UICollection can be defined similarly to UIElement. UICollections are most useful in cases where chosen HTML element locator methods can return multiple objects of type UIElement. All of them will be stored in UICollection, as opposed to UIElement where in case multiple elements are returned, only the first one will be selected.
Available methods for UICollections:
get(int index)– method will return an object of type UIElement, that is stored in the list at index position.first()– method will return the first object of type UIElement from UICollection.findByVisible()– method will return the first object of type UIElement from the UICollection that is visible.findByEnabled()– method will return the first object of type UIElement from the UICollection that is enabled.findByExist()– method will return the first object of type UIElement from the UICollection that exists in the HTML DOM.findByText(String text)– method will return the first object of type UIElement from the UICollection that contains the provided text (not case sensitive).
For this example, let’s define UICollection for the found results after searching for “Selenium Webdriver” in Wikipedia’s search bar:
UICollection collection = EE(byCssSelector(".mw-search-result-heading"));
In the code snippet below you can see how all Wikipedia’s search results titles that match the same selector are stored in `collection` (object of type UICollection), and the first title is returned:
String firstResult = collection.first().getText();
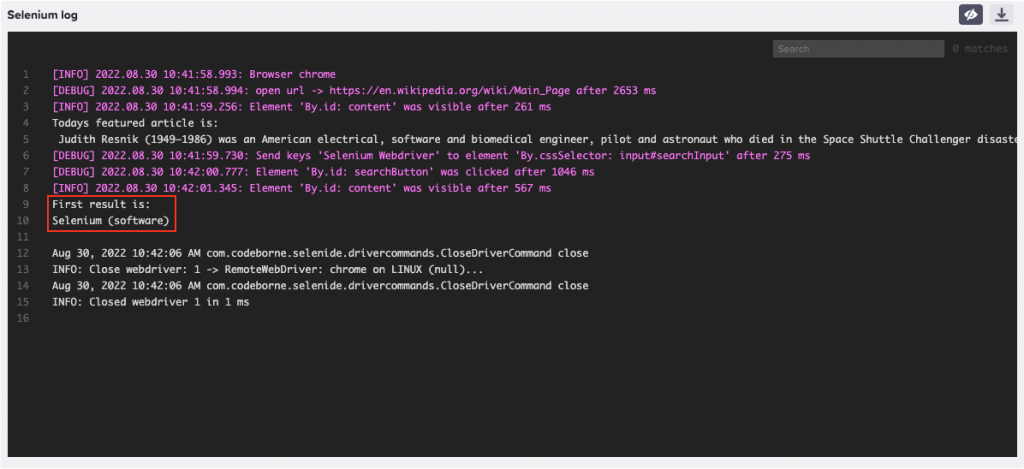
The first title in collection, that is being logged out in Loadero test script can be viewed in Selenium logs:
Putting everything together and configuring a test in Loadero
What we have already described is enough to start test automation with Java: write a test script and launch a test run locally or in Loadero. Our full script of automation for the Wikipedia page looks like this:
//HTML elements that will be used
UIElement searchInput = E(byCssSelector("input#searchInput"));
UIElement searchButton = E(byId("searchButton"));
UIElement todaysArticle = E(byCssSelector("#mp-tfa p"));
UIElement pageContainer = E(byId("content"));

//open url and wait until page container is visible
open("https://en.wikipedia.org/wiki/Main_Page");
pageContainer.waitFor(10).untilIsVisible();

//get text of today's article
String text = todaysArticle.getText();
System.out.printf("Todays featured article is:\n %s", text);

// input text in search input field
searchInput.waitFor(10).untilIsVisible().sendKeys("Selenium Webdriver");
searchButton.click();
// alternative: searchInput.sendKeys(Keys.ENTER);

//take a screenshot
pageContainer.waitFor(10).untilIsVisible().saveScreenshot("screenshot.png");

//save all search results titles in a `collection`
UICollection collection = EE(byCssSelector(".mw-search-result-heading"));
String firstResult = collection.first().getText();
System.out.printf("First result is:\n%s", firstResult);
The test script is ready and in order to launch a test run from the cloud, a project and test have to be created in Loadero, paste the script to it, set the test parameters and configure test participants. May sound like a lot of effort, but if you follow this step-by-step guide, you’ll be able to prepare all that in a matter of minutes.
Important: Running a test in Loadero will require creating an account and the first project. A free trial will be applied to it automatically and you’ll be able to run your test free of charge. If you don’t have an account yet, start by creating one here.
That’s it! Now you are ready to use Java Test-UI for creating automation test scripts and running them at scale from the cloud.
The full script of the automated Wikipedia page can be found here and documentation of TestUI that will be helpful to create your future Loadero Java+Test-UI scripts can be found here.
Start your journey of test automation with Java, and if you have any issues or questions, feel free to contact our helpful support team by writing in the web chat or email us at support@loadero.com.


