

Load testing may seem like a simple task that anyone should be able to do on their own. You just have to be ready for the worst – service crashing completely. But in practice it is almost never that simple, especially with larger projects that are in more mature development stages, projects with many customers or business processes that require more bureaucracy to communicate between parties involved. Engineers from Loadero team have created load tests for different kinds of applications. So we summed up the experience in this blog post to help you perform load tests.
Each load test follows almost exactly the same scenario, no matter how big or small the service is or how high the target load is set. For some simpler cases a step or two might be omitted, but in general the steps will always be the same.
Step 1: Establishing the expectations
First thing that has to be done is determining what should be the outcome of the load tests. There can be multiple reasons why you might need to perform load tests and each of them will have different specifics on how to prepare the scenario, code, which tool to use and many other considerations. Common use cases for load testing are determining the capacity of the current system, regression testing for a new release, or even testing external provider capacity. In one-off tests it can be feasible to use a more expensive tool that speeds up the setup process and not worry too much about maintainability. If the tests are expected to be regularly repeated, then it is worth spending a bit more time in the initial setup and saving more money and resources in the long term.
Step 2: Choosing general parameters and approach
The second step, usually done almost together with the first step, is choosing general parameters. Given the maximum expected virtual participants, the tool can be chosen based on its capability to generate users as well as on other parameters such as ease of use and how suitable it is for the intended test.
Ramp-up strategy
One of the most important parameters of a load test that is often not set by the stakeholders, but rather by the test engineer themselves, is the ramp-up strategy. Ramp-up strategy can impact the outcome of the test results if the virtual participants connect to the service too fast. If 1000 users start the test at the exact same time, the service can crash just because it can’t handle 1000 new connections, not because it can’t handle 1000 concurrent connections. If you are choosing an approach to your load test and are not sure which ramp-up strategy fits your needs best, make sure to take a look at this post published in our blog. It describes the ramp-up strategies we offer in Loadero and examples of their use.
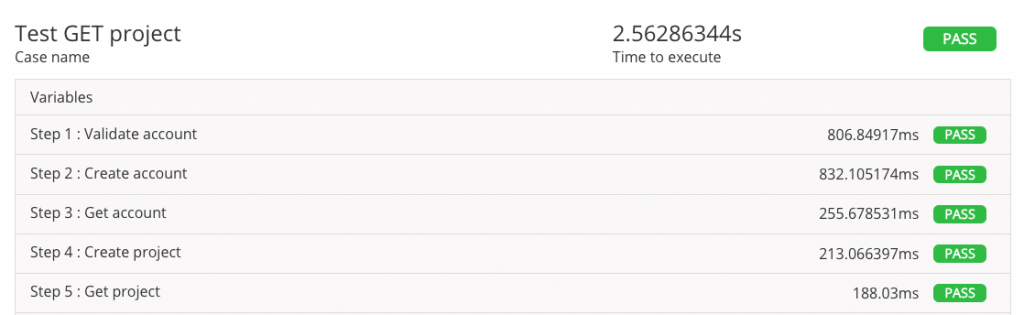
Quite often account creation and login requests take significantly longer than other requests such as retrieving cart contents, etc. Take, for example, the the API test report below – account creation takes about four times longer than the following requests. And the request to be executed most often – GET project – is executed the fastest. Meaning that the overall application performance is actually better than the average of all these request duration, since account creation is not performed as frequently.
Another common issue that can arise from inappropriate choice of ramp-up strategy is test failing without being able to tell how many users did the service support. Often people want to get the job done faster and decide to run full load immediately. In our experience, many services crash when the app is put under load. Usually this can be easily fixed with a few tweaks and optimizations. But it is almost always worth it to start tests with around 10% of the maximum expected load and then continue slowly increasing the load. This will allow to make early observations, stop the test earlier and do some fixes before going for full load. We recommend this approach to most Loadero customers, whom we consult on how to perform load tests.
Step 3: Preparing the test scenario
The next step is quite obvious, and often might take the most time – preparation of the test scenario. This is when load test and automation engineers will design the scenario and write the necessary automation code. If you use Loadero, scaling up existing tests to perform load tests with the same scenarios is quite easy. This can be done in a matter of minutes, make sure to read this blog post about transforming a small-scale test to a load test.
The biggest caveat when preparing the scenario might be the preparation of credentials. Most applications implement some sort of authentication and they may not support reuse of the same credentials. This should be solved together with the app engineers as options include registrations during the test or use prepared accounts. You can learn how to use hardcoded or externally hosted credentials from this blog post with explanations and examples.
Once the code has been prepared, it should be tested with multiple concurrent users on a small scale to make sure it scales properly.
Step 4: Preparing the environment
While automation engineers are preparing the test script, it is time to start thinking about where the test will be executed. Running in any non-production environment might have inaccurate results as the environment is different. While running in the production environment carries the risk of the production environment crashing. There are multiple possible solutions here, the ideal solution being to set up a production clone. This environment should match hardware and software settings of the production environment to mimic it as closely as possible. If this is not possible, then it may be possible to run the tests in the actual production environment, if there is a low usage period (like night). The latter option should be avoided whenever it is possible due to a great risk involved when you perform load tests in the production environment.
Step 5: Scheduling the tests
Once the environment and the script are ready, everyone is eager to start testing. But there is one critical step that needs to be done beforehand, to get the maximum value out of the tests – scheduling the test execution with all stakeholders. While it may be possible to see the site crash on your own, this may not provide as much value as when other parties are involved in the test. There are multiple stakeholders to notify, depending on the app specifics – QAs, developers, operations team, marketing, possibly even third party vendors.
Each of these parties has their own role in the load testing process. QAs will perform manual evaluation while the app is under load; developers will verify and possibly update app configuration; operations team will be needed to monitor server performance and in case the site actually crashes they will need to re-establish service availability as soon as possible.
One of the most interesting parties to involve is marketing, especially if the test is executed in the production environment. Marketing team is definitely monitoring site visits in a tool like Google Analytics, so you must warn them to take load tests into account and possibly even disable some integrations for the duration of the test. While seeing a spike in site visits will be for the known reason, the long term statistics will be messed up, and marketing team will not be able to correctly see the trends due to the skew in data.

Step 6: Running the tests
Once all prerequisites mentioned above are satisfied, it is time to start testing. The first test execution of a new load test always carries some unforeseen circumstances – errors in the app, problems in the script or someone just not being ready on time. Key things to remember when you perform load tests:
- Start small, don’t go to full load immediately;
- Keep checking the app manually, even if there are QAs doing the same thing – you’ll be able to spot critical errors faster and make decisions about continuing the test quicker;
- Synchronize with other stakeholders to agree if to proceed with the test or to stop it and fix the issues already found.
Run the tests, again
After running the test for the first time, take a moment and re-evaluate how it went and what can be improved – maybe the test script can be improved or maybe some quick fixes to the system itself. For one-off load tests you will almost always repeat the tests soon after the first test execution because the first test found some problems. You shouldn’t feel bad if your app didn’t pass the test on the first try – it is almost impossible to detect performance issues when a developer is testing on their local machine or finding them during regular system use.
Step 7: Reporting to management
Once the tests are completed, only one thing remains – summarizing and reporting the test results. This is the thing noone is really looking forward to as all of the fun stuff is completed and only paperwork remains. But this part can be very critical to keep a record of findings that were noticed during the load test. This will come in handy when developers will start working on improving service infrastructure and will reduce preparation time for the next load test quicker.
The reports should include the key facts about the load test – scenario explained, timestamps of the tests, data from the test runner as well as metrics collected from the system side. Since load tests are often done in multiple repeated attempts, it is also possible to add comparison of the test runs to see improvements and highlight the configuration of the application that provided the best results.
With the reports written and submitted, load tests can finally be called done. Each load test will be different, even for two e-commerce sites built using the same platform tests will be different as the target audience and the expectations from load tests are different. You can use this guide to design your load test, or if you would like to leave load testing for others – our door is always open!


